
English
Hi there, friends of the HiveDiy community, how are you today? I hope you are doing great!
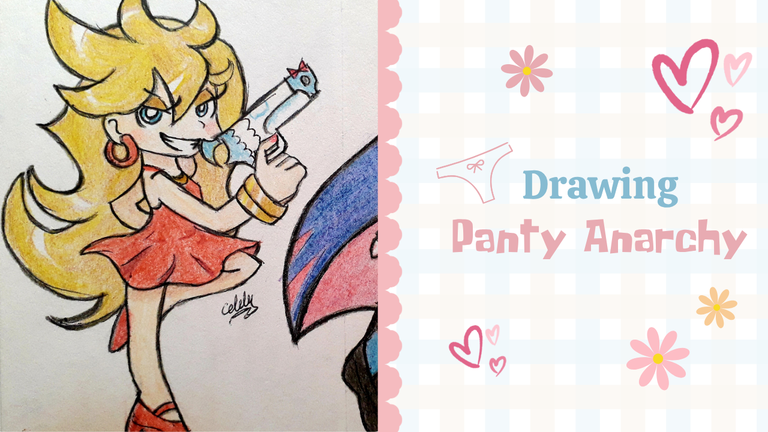
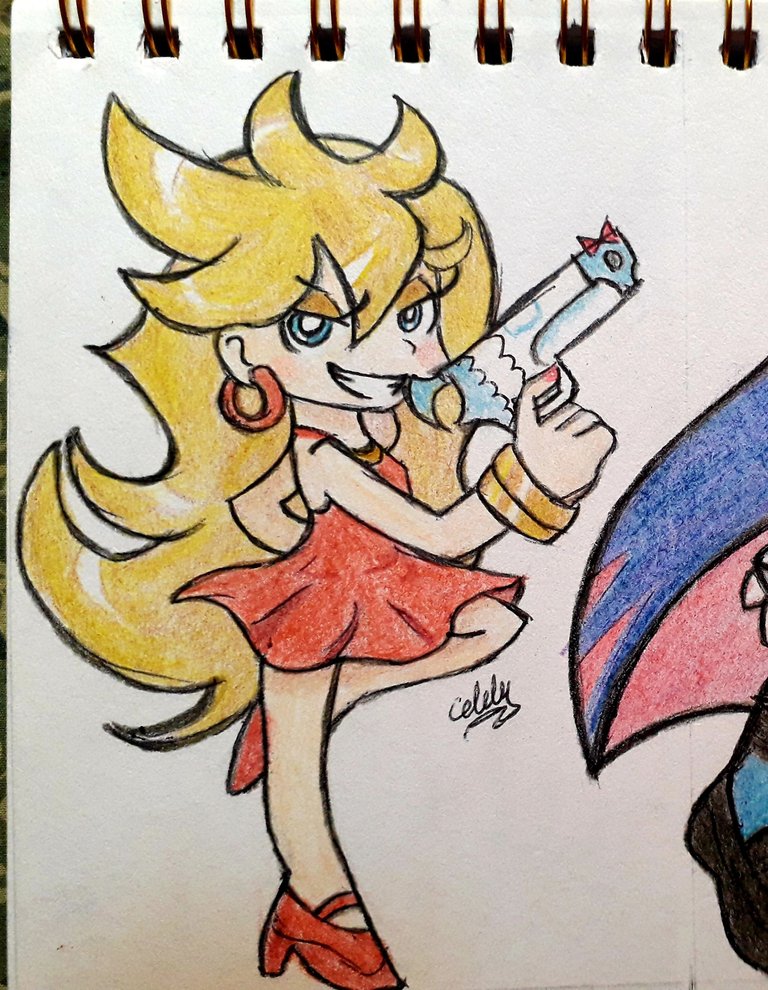
I'm back with a new drawing tutorial. Today I'm going to draw Panty Anarchy from Panty&Stocking, a beautiful blonde angel. Trying to do a style similar to the series, did I succeed?
The difference from my previous drawings is that today, I tried to color it, doing blends and so on with wood colors. It's my first time with this, so patience and let's go!
Materials
Graphite pencil 2 HB.
Black pencil.
Warm brown pencil.
Purple brown pencil.
Yellow color pencil.
Red color pencil.
Light blue pencil.
Cream or peach-colored pencil.
Pink colored pencil.
Eraser.
Pencil sharpener.
 |  |
|---|
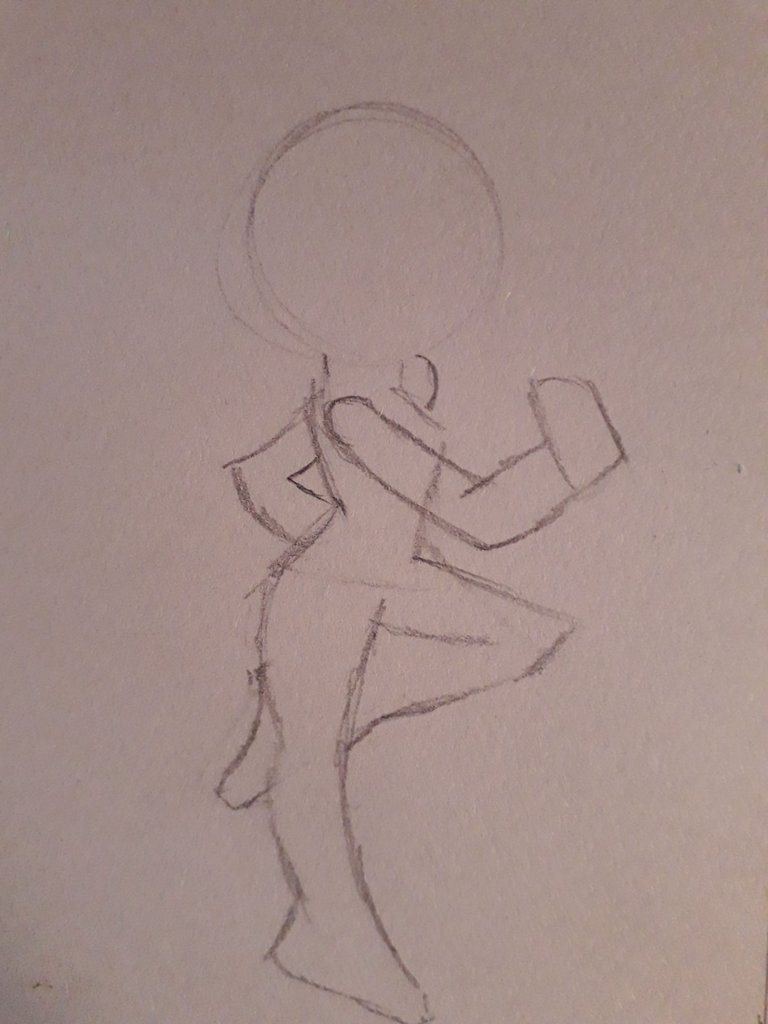
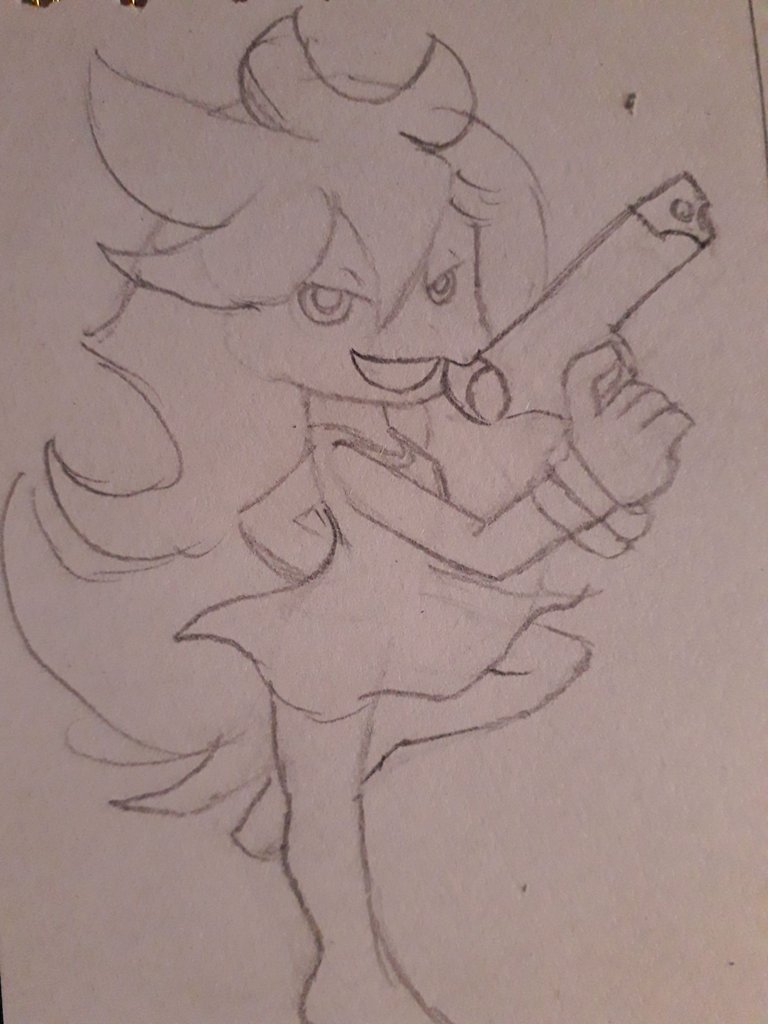
I started by sketching the body, using mostly certain geometric figures. I don't know anything about anatomy, but it's not that necessary for this style of drawing. Furthermore, I really like Panty&Stocking's drawing style because it's a mix of anime and cartoon. Even though their anatomy looks simple, they do a good job shaping the bodies and personalities of each character.
After sketching the body, I defined the general shapes of the head and limbs, and then I gently erased, leaving just the outline of the drawing.
 |  |
|---|
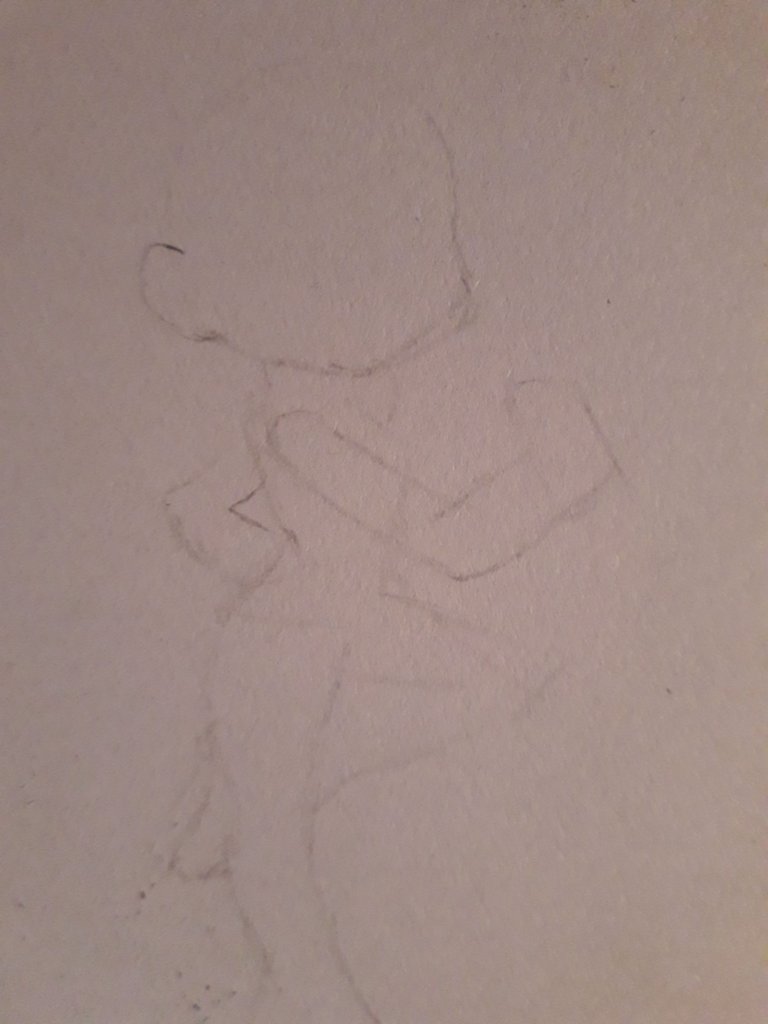
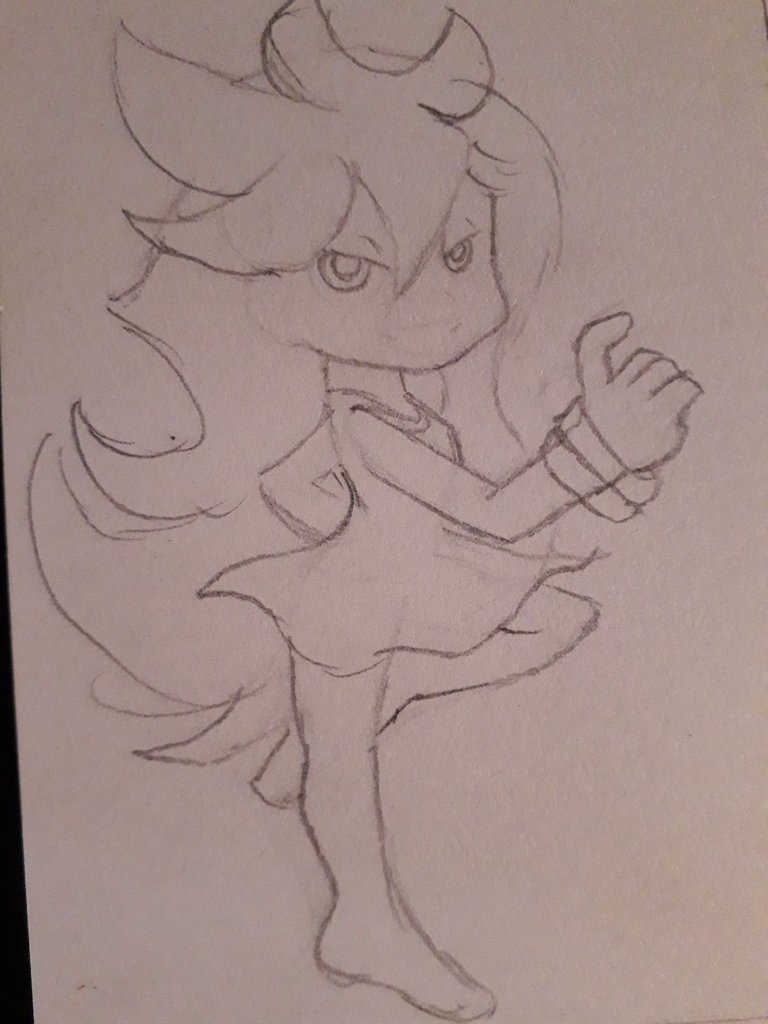
I added the most important elements, such as the hair (which is quite complicated with its spiky shapes) and the dress (which is a skirt with lots of waves). I also drew the face and the accessories, like the bracelet and the gun.
 |  |
|---|
 |  |
|---|
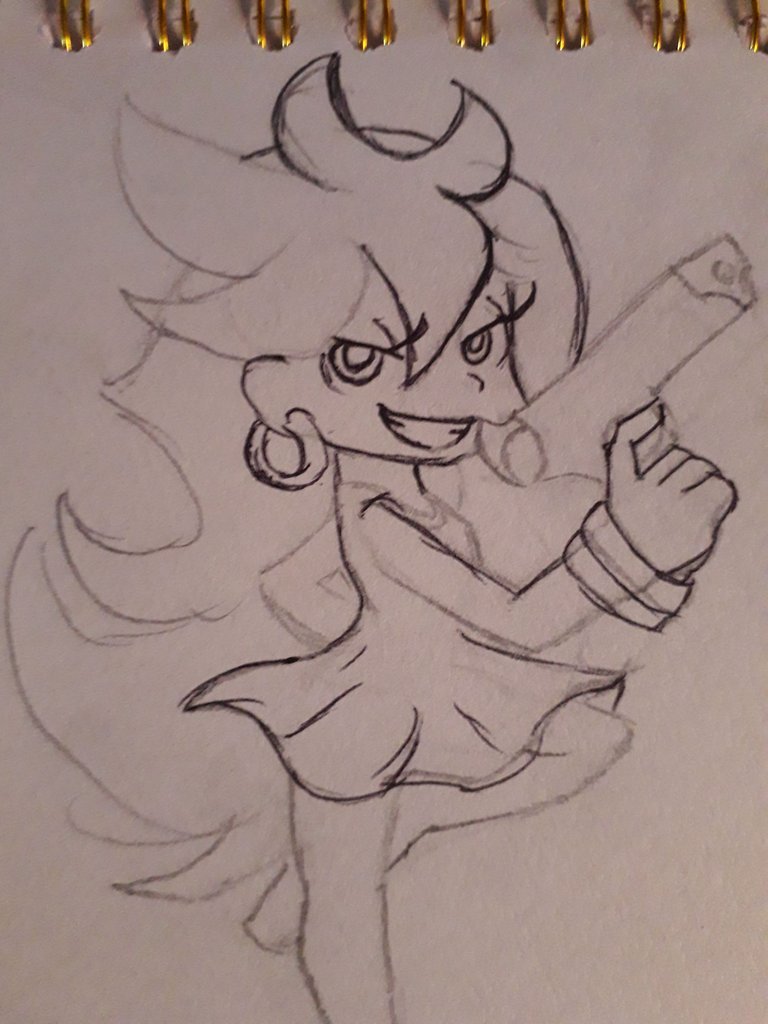
With the black pen, I began to outline the whole drawing, starting to add smaller details, such as the eyelashes, the earring, the details of the gun, and the heels.

Once I had outlined the entire drawing, I ran the eraser over it to remove any traces of graphite that might mess up the coloring later.
I know the strokes are quite dirty, but trust the process.
 |  |
|---|
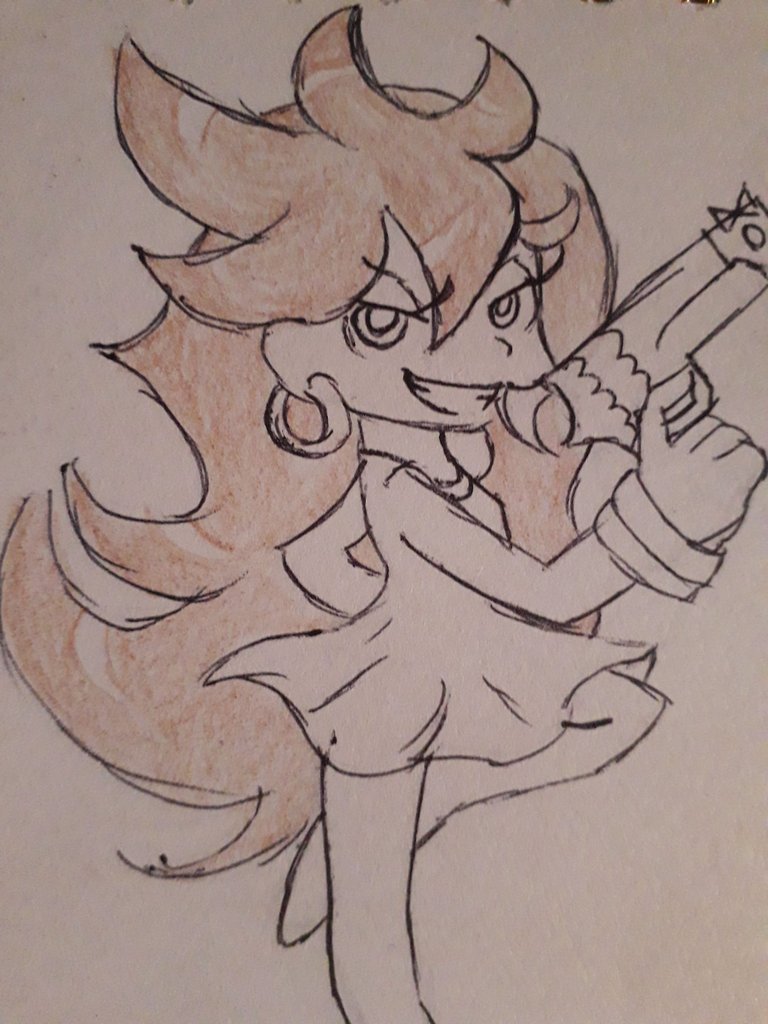
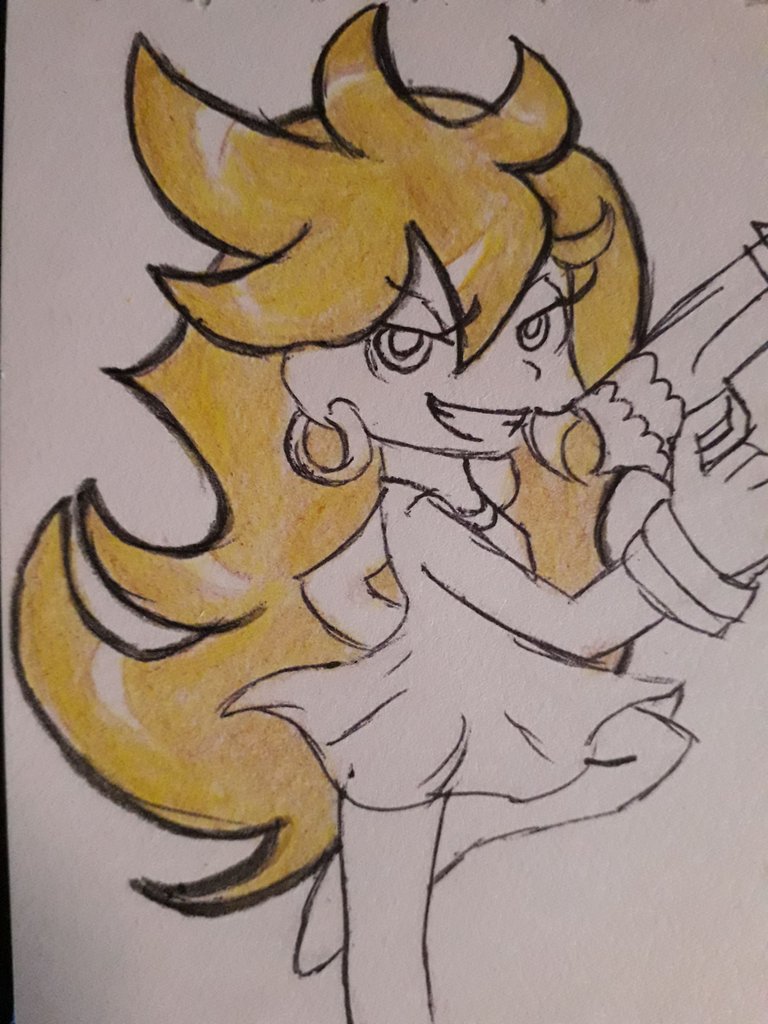
I started by gently running a warm brown color over the entire hair area, leaving just a few beams of light in white.
Then, I gently ran yellow color over the top. And so I went through layer upon layer of color, alternating between yellow and warm brown, without putting too much pressure and giving all the strokes in the same direction.
 |  |
|---|
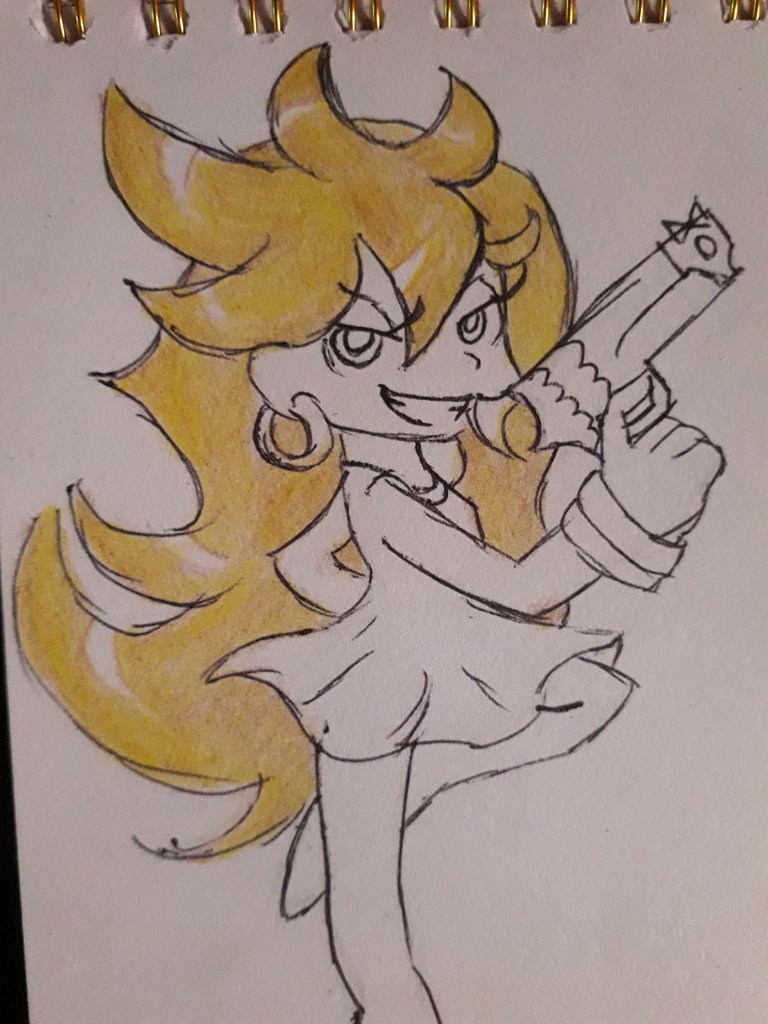
I continued giving layers of color until they reached the desired tone. In the area closest to the body, I left without coloring so much, since I had planned to give shadows there. To give the shadows in that area, I painted only with brown color. The shadow is very subtle, but it is present.
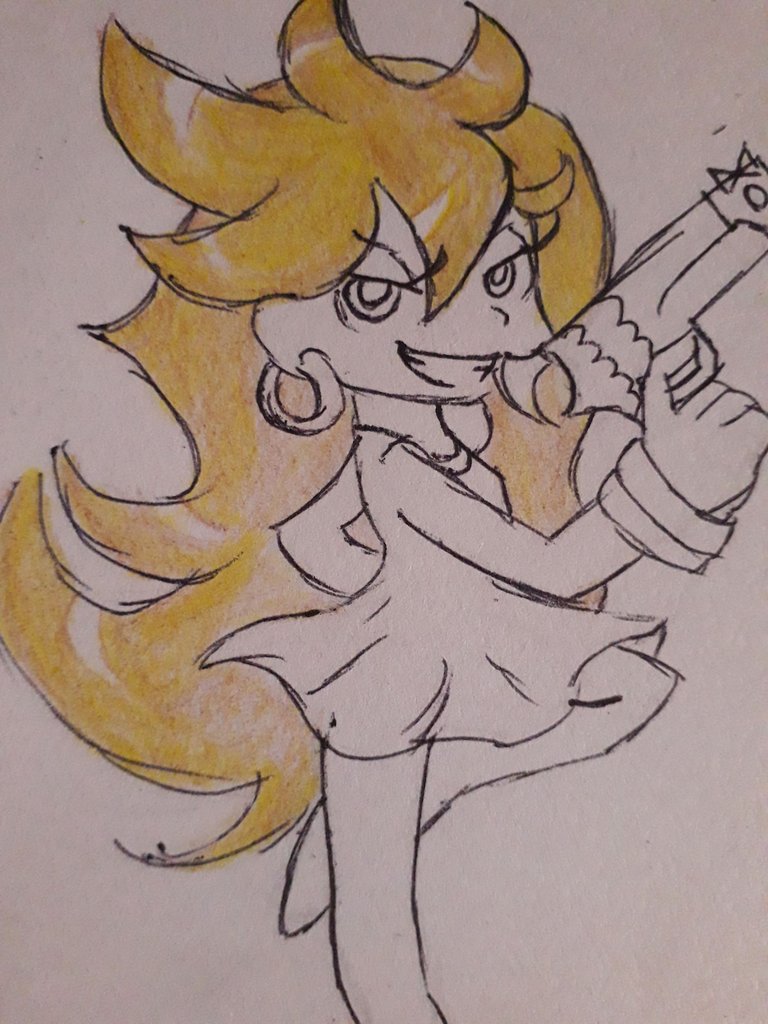
The next thing was to highlight all the outline of the hair, using a black color. I did a pretty thick outline, trying to imitate this cartoon style; I felt it would look better this way.

With a bit of red, I subtly swiped across the cheeks, in a circular motion, to give a blush. Then, with warm brown, I subtly swiped in areas where there might be more shadows, such as under the bangs, under the neck, on the left arm, and under the skirt. I also swiped brown along the folds of the skirt to give shadows. Lastly, using a cream or peach color, I subtly swiped all over the skin to give some color. All the colors I used are very strong, but I made the strokes, as subtle as I could to barely leave any color….
By the way, did you notice that I painted her nail red? How chic! I love red; I think I'll buy nail polish soon.
 |  |
|---|

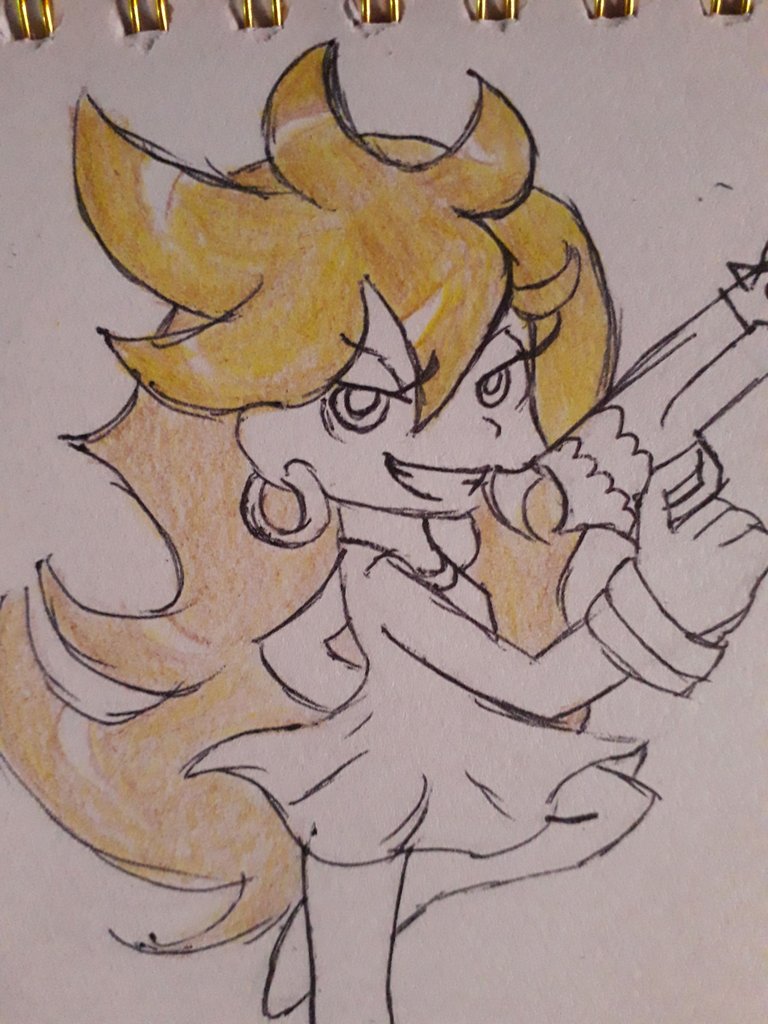
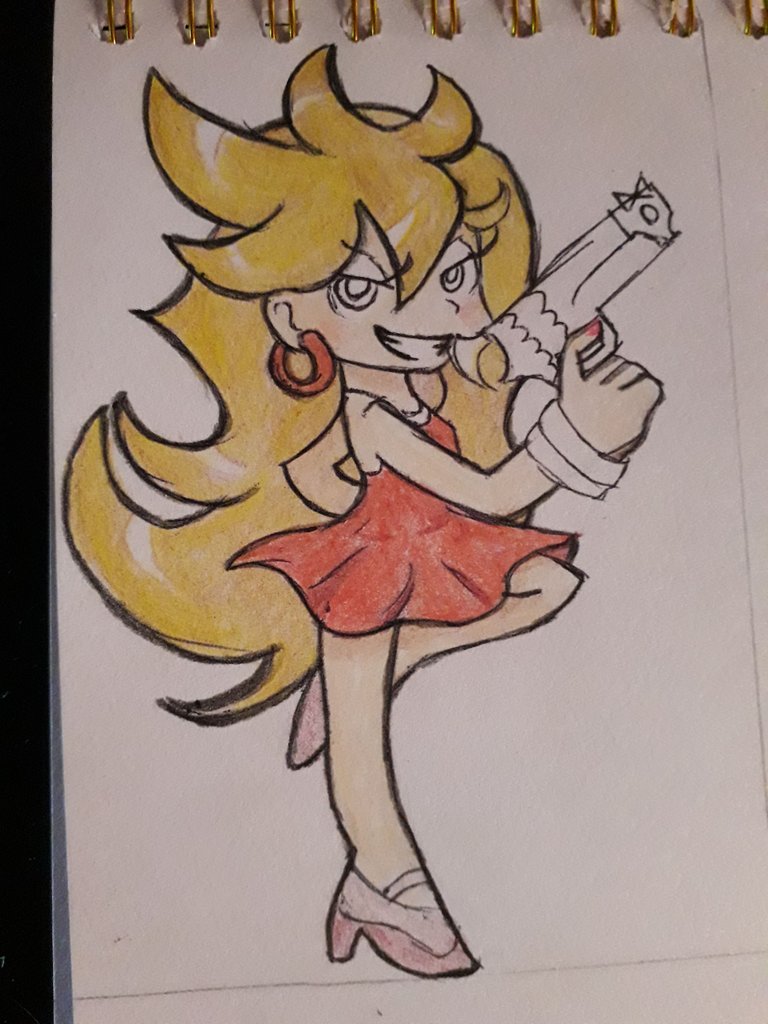
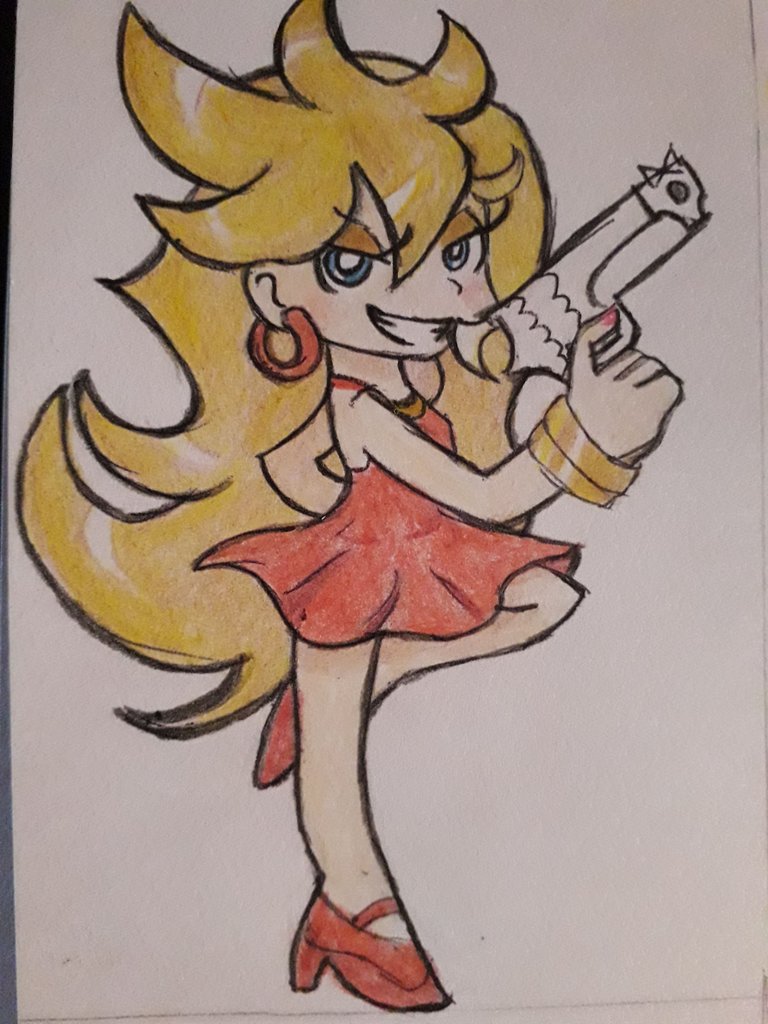
I colored the dress in a single layer, passing the red color gently over and over again, until it had the desired intensity.
For the shoes, I used a brown with a purple shade to color the shadow areas. As you know, I applied a layer of brown first, and then a layer of red, and so on, little by little, until it reached the desired tone….
Did you notice that I colored the earring? I feel like without earrings, it's not Panty. By the way, I really love Panty's style, maybe even more than Stocking's, because it's closer to the style I'd like to have… Too bad I'm a black-haired, and bleaching my hair is a NO for me.
On the other hand, I don't know anything about coloring, but this was a chance to experiment a little with colors. After all, that's how you learn. The bad thing is that I only have 12 colors, and some of them don't blend so well together.
 |  |
|---|
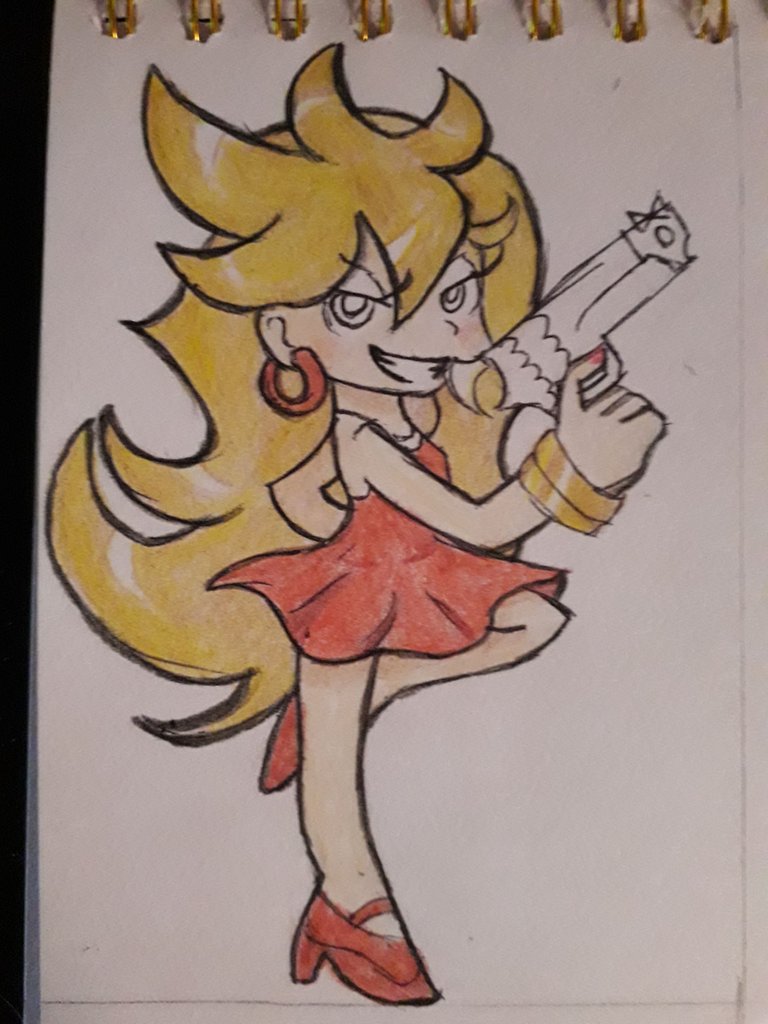
The next thing was to color the bracelet. I go around using brown for everything, it seems, hahaha. But well, yes, I used brown color as a base, leaving only two stripes without coloring, as you can see in the image on the left.
The next thing was to pass yellow color over it, giving a yellow color like gold, similar to the hair. Then, I painted one of the stripes yellow and left the other one uncolored. I think I did the best I could with that idea of glitter on the bracelet.
For the shadows, I also used brown and yellow. The difference was that this time I used yellow as a light base and then applied brown with much more intensity.
I realized something that may sound obvious, but the colors change depending on how much of one or the other you use and which layer you finish with. Or at least that's how it seems to be here.
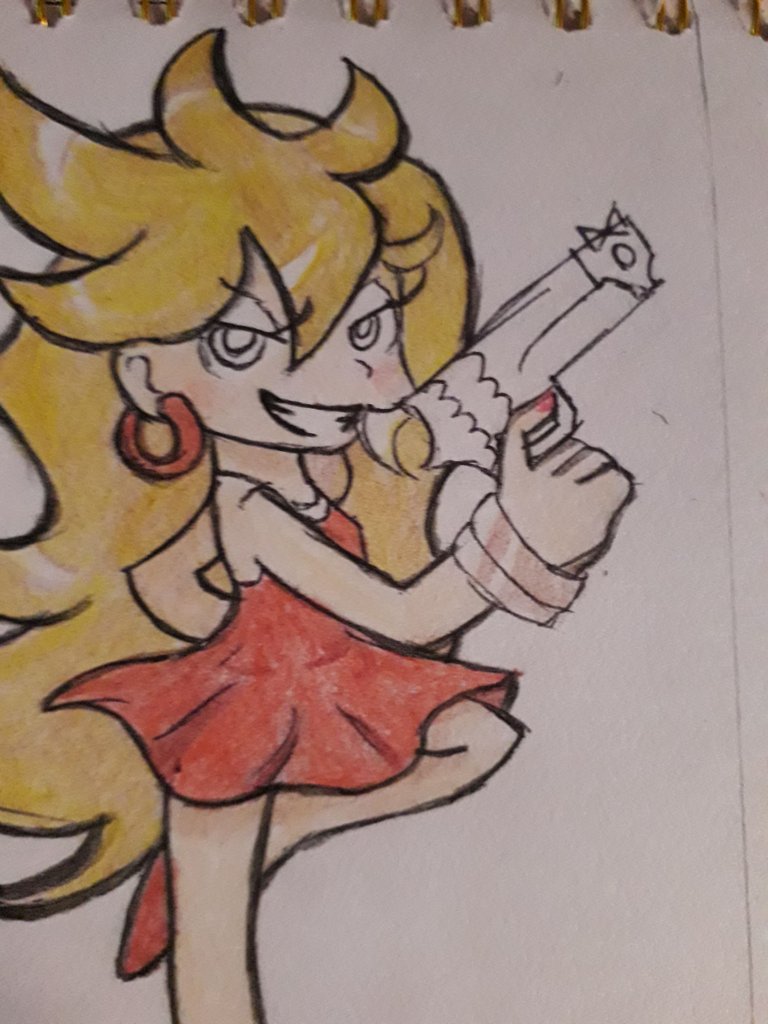
Anyway, with this, Panty's drawing is almost ready; the only thing left to do is to detail his gun.
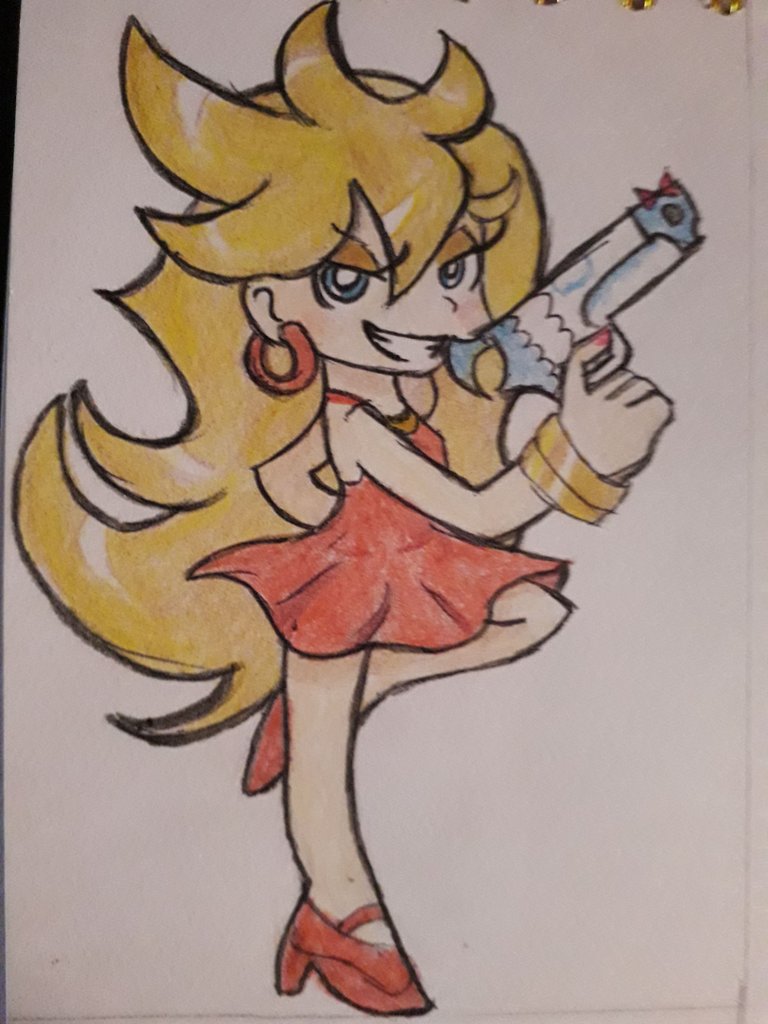
For the details on the gun, I used a light blue color and pink on the ribbon.
And that would be it.
I really liked this drawing. I consider that, despite everything, Panty is much easier to draw than Stocking. And speaking of Stocking, there you have a little spoiler, hehehe. So yes, the next tutorial will be about Stocking Anarchy.
I don't have much more to say. I'm happy that this drawing is the first one I did in my Sketchbook. Likewise, I was afraid to release my Sketchbook because I didn't want to “damage” it with ugly drawings, but I realized that the only harmful thing here is that mentality. I believe that we should draw no matter if our art is ugly or not, because taking the first step is the most important thing there is.
So, I dared. Now I feel that I just want to draw, and draw for me. In this case, this drawing was for my followers of my now-defunct WhatsApp channel, but I still saw it as an opportunity to learn and experiment. Anyway…
Hope you liked my post!
Without anything else to add… Take care, drink water, and don't forget to smile. Love you! See you in the next post, bye!
Español
Clic aquí!
Holiii, amigos de la comunidad de HiveDiy, ¿cómo se encuentran el día de hoy?, ¡Espero que muy bien!
He vuelto yo, con un nuevo tutorial de dibujo. Hoy voy a dibujar a Panty Anarchy de Panty&Stocking, un precioso ángel rubio. Intentando hacer un estilo parecido al de la serie, ¿será que lo logré?
La diferencia de mis dibujos anteriores es que hoy, ahora sí, intenté colorearlo, haciendo mezclas y demás con colores de madera. Es mi primera vez con esto, así que paciencia y ¡vamos allá!
Materiales
Lápiz de grafito 2 HB.
Lapicero negro.
Lápiz de color marrón calido.
Lápiz de color marrón moradizo.
Lápiz de color amarillo.
Lápiz de color rojo.
Lápiz de color azul claro.
Lápiz de color crema o melocotón.
Lápiz de color rosado
Borrador.
Sacapuntas.
| |
|---|
Comencé por bocetear el cuerpo, utilizando mayormente ciertas figuras geométricas. No sé nada de anatomía, pero no es tan necesario para este estilo de dibujo. Me gusta mucho el estilo de dibujo de Panty&Stocking porque es una mezcla de anime y cartoon. Aunque su anatomía parezca simple, hacen un buen trabajo dando forma a los cuerpos y personalidad de cada personaje.
Después de bocetear el cuerpo, definí las formas generales de la cabeza y extremidades, para luego pasar el borrador suavemente, dejando apenas la silueta del dibujo.
| |
|---|
Añadí los elementos más importantes como el cabello (el cual es bastante complicado con sus formas tan puntiagudas) y el vestido (el cual es una falda con muchas ondas). También dibujé el rostro y los accesorios, como el brazalete y la pistola.
| |
|---|
| |
|---|
Con el lapicero negro, comencé a remarcar todo el dibujo, comenzando a añadir detalles más pequeños, como las pestañas, el arete, los detalles del arma y los tacones.
Una vez remarcado todo el dibujo, pasé el borrador para eliminar cualquier rastro de grafito que pudiera ensuciar el coloreado más tarde.
Sé que los trazos están bastante sucios, pero confíen en el proceso.
| |
|---|
Comencé por pasar suavemente un color marrón cálido por toda el área del cabello, dejando solo algunos haces de luz en blanco.
Luego, pasé suavemente color amarillo por encima. Y así fui pasando capa sobre capa de color, alternando entre amarillo y marrón cálido, sin poner mucha presión y dando todos los trazos en la misma dirección.
| |
|---|
Seguí dando capas de color hasta que fueron alcanzando el tono deseado. En la zona más cercana al cuerpo, dejé sin colorear tanto, ya que tenía pensado dar sombras ahí. Para dar las sombras en esa zona, pinté únicamente con color marrón. Es muy sutil la sombra, pero está presente.
Lo siguiente fue remarcar todo el contorno del cabello, usando un color negro. Hice un contorno bastante grueso, intentando imitar este estilo cartoon, sentí que se vería mejor así.
Con un poco de rojo, pasé sutilmente por las mejillas, en forma circular, para dar sonrojo. Luego, con marrón cálido, pasé sutilmente en las zonas donde podría haber más sombras, como debajo del flequillo, debajo del cuello, en el brazo izquierdo y debajo de la falda. También pasé marrón por los pliegues de la falda, para dar sombras. Por último, usando un color crema o melocotón, pasé sutilmente por toda la piel, para dar algo de color. Todos los colores que usé son muy fuertes, pero hice los trazos, lo más sutil que pude para apenas dejar color…
Por cierto, ¿se dieron cuenta de que le pinté la uña de rojo? ¡Qué chic! A mí me encanta el rojo, creo que me compraré un esmalte pronto.
| |
|---|
Coloreé el vestido en una sola capa, pero pasando el color rojo suavemente una y otra vez, hasta que quedó con la intensidad deseada.
Para los zapatos, utilicé un marrón con una tonalidad como morada, para colorear las zonas de sombra. Como ya saben, di una capa de color marrón primero, y luego una capa de color rojo, y así poco a poco hasta que alcanzó el tono deseado…
¿Ya se dieron cuenta de que coloreé el arete? Siento que sin aretes no es Panty. Por cierto, me encanta mucho el estilo de Panty, incluso quizá más que el de Stocking, porque se asemeja más al estilo que yo quisiera tener… Lástima que soy pelinegra y decolorar mi cabello es un NO para mí.
Por otro lado, no sé nada de coloreado, pero esta fue una oportunidad de experimentar un poquito con los colores. Después de todo, así es como se aprende. Lo malo es que tengo solo 12 colores, y algunas no se mezclan tan bien entre sí.
| |
|---|
Lo siguiente fue colorear el brazalete. Yo ando utilizando el color marrón para cada cosa, parece, jajaja. Pero bueno, sí, utilicé color marrón como una base, dejando solo dos franjas sin colorear, como pueden ver en la imagen de la izquierda.
Lo siguiente fue pasar color amarillo por encima, dando un color amarillo como dorado, similar al del cabello. Luego, pinté de color amarillo una de las franjas y la otra la dejé sin colorear. Creo que hice lo mejor que pude esa idea de brillo en el brazalete.
Para las sombras también utilicé marrón y amarillo. La diferencia fue que esta vez usé amarillo como base ligera y después apliqué color marrón con mucha más intensidad.
Me di cuenta de algo que puede sonar obvio, pero los colores cambian dependiendo de qué tanta cantidad uses de uno o de otro y con cuál capa acabes. O al menos así parece ser acá.
En fin, con esto estaría prácticamente listo el dibujo de Panty, únicamente falta por detallar su pistola.
Para los detalles de la pistola, utilicé un color azul claro y rosa en el listón.
Y ya estaría.
Me gustó mucho este dibujo, considero que, a pesar de todo, Panty es mucho más fácil de dibujar que Stocking. Y hablando de Stocking, ahí tienen un pequeño spoiler, jijiji. Así que sí, el próximo tutorial será acerca de Stocking Anarchy.
No tengo mucho más que decir. Estoy feliz de que este dibujo sea el primero que hice en mi Sketchbook. Tenía miedo de estrenar mi Sketchbook, porque no quería “dañarlo” con dibujos feos, pero me di cuenta de que lo único dañino que hay acá, es esa mentalidad. Creo que debemos dibujar sin importar si nuestro arte es feo o no, pues dar el primer paso es lo más importante que existe.
Entonces, me atreví. Ahora siento que solo quiero dibujar, y dibujar para mí. En este caso, este dibujo fue para mis seguidores de mi ya extinto canal de WhatsApp, pero aun así lo vi como una oportunidad para aprender y experimentar. En fin…
¡Espero que te haya gustado mi post!
Sin nada más que añadir… Cuídense, tomen agua, y no se olviden de sonreír. ¡Se les quiere! Nos vemos en el próximo post, ¡chau!
Credits | Créditos
- English translation DeepL (sorry for any mistakes, English is my second language)
- Traducción al inglés DeepL (lo siento por cualquier error, el inglés es mi segundo idioma.)
- Cover, dividers, and banners made in Canva
- Portada, separadores y banners hechos en Canva
- Photos used in the post were taken by me, using a Samsung Galaxy J6
- Las fotos usadas en el post fueron tomadas por mí, usando un Samsung Galaxy J6
Posted Using INLEO
Your drawing is beautiful and neat. Thanks for walking us through the drawing process, we love how your drawing came to life with each step. Well done.
selected by @ibbtammy
I am very glad you liked it. Thanks for your support!
Congratulations @celely! You have completed the following achievement on the Hive blockchain And have been rewarded with New badge(s)
Your next target is to reach 1500 replies.
You can view your badges on your board and compare yourself to others in the Ranking
If you no longer want to receive notifications, reply to this comment with the word
STOPCheck out our last posts: