
Saludos Hivers y cosmonautas. Ha sido una larga semana tratando de moverme en muchas cosas, primero debo agradecer:
@ecoinstant
@aggroed
@blocktrades
@theycallmedan
@filoriologo @joheredia21 y @jkalthor
Eso por solo nombrar algunos pocos. Gracias por el apoyo y sus notas para con la app. Seguire mejorando para convertirla en uan herramienta poderosa. Desde ya les digo que este es un MEGA ARTICULO que consta de 3 partes:
- Ultimas actualizaciones a AegisPad
- Guia detallada de como hacer un cargador de fotos a hive usando next15
- Oferta para quienes se quieran probar la app
Parte 1: Actualizaciones de AegisPad:
Sugerencias de Etiquetas con IA en el TagInput:
- Se añadió un botón para que puedas pedirle a la IA sugerencias de etiquetas, ya sea las "Populares en Hive" o "Basadas en el Contenido del Artículo".
- Ahora verás estas sugerencias en una pequeña ventana emergente (Popover) con etiquetas clickeables (Badges).
- Las etiquetas que añadas desde estas sugerencias de IA tendrán un color diferente para que las distingas.
- El campo de etiquetas ahora muestra un contador (por ejemplo, "3/10 etiquetas").
Revisión de Artículo con Sugerencia de Etiquetas:
- La función que revisa tu artículo con IA ahora también puede, si lo pides, sugerir entre 3 y 5 etiquetas relevantes.
- En la página donde revisas el artículo, encontrarás un checkbox para activar esta opción de sugerencia de etiquetas.
- Integración de Etiquetas Sugeridas en el Flujo de Publicación:
- Si la IA te sugiere etiquetas durante la revisión, estas se guardarán automáticamente cuando pases a la "Revisión Final".
- Al llegar a la página de "Revisión Final", estas etiquetas sugeridas ya aparecerán en el campo de etiquetas (siempre que no tuvieras otras etiquetas ya puestas, aparte de la que viene por defecto).

Organización de la Barra de Herramientas Markdown (MarkdownToolbar):
- Se reorganizaron los botones en grupos lógicos (Estilos, Encabezados, Bloques, Insertar) utilizando menús desplegables. Esto mejora la usabilidad y facilita la adición de nuevas funcionalidades útiles para el blogger en el futuro.
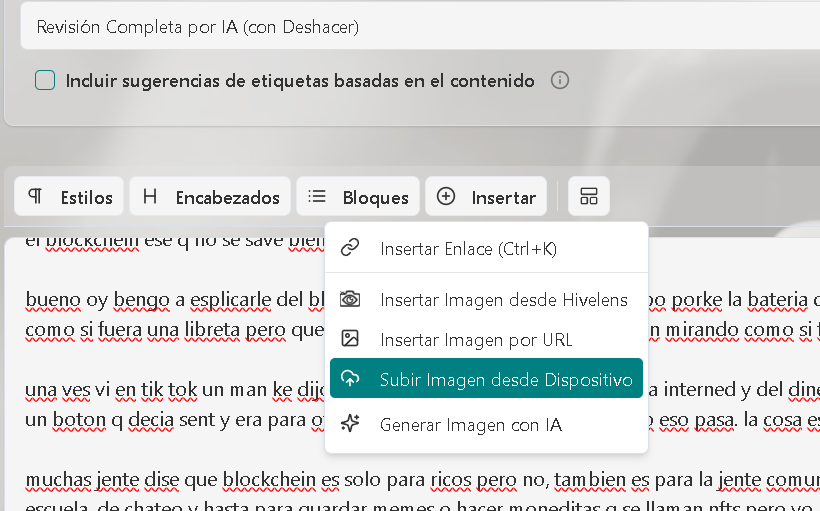
Subida de Imagenes a HIVE o Cloudinary como fallback
- Coloque un boton para subir imagenes que primero intenta subir a los servidores de imagenes de HIVE y sino responden, usara los de ecency y si no funciona usara como respaldo el CDN del proyecto en cloudinary
Mejoras extra para Usuarios:
- Se añadieron mensajes en la consola del navegador para que sea más fácil ver cómo fluyen las sugerencias de etiquetas desde el servidor (esto es más para desarrollo y pruebas).
- Este mismo botón se desactivará si ya has alcanzado el límite máximo de etiquetas permitidas.
Parte 2: Guía Detallada: Subir Imágenes a Hive con Firma en Next.js
Este tutorial te guiará a través del proceso de implementación de un sistema de subida de imágenes a servicios compatibles con Hive (como images.hive.blog o images.ecency.com/) que requieren una firma criptográfica para autenticar la subida. Usaremos Next.js (App Router), TypeScript, y la librería dhive.
Requisitos Previos
- Node.js (versión LTS recomendada)
- Un proyecto Next.js (puedes crear uno con
npx create-next-app@latest --typescript) - Una cuenta de Hive con su clave de posting privada.
- Variables de entorno configuradas para las credenciales.
¿Por qué se necesita una firma?
Los servicios de alojamiento de imágenes basados en Hive utilizan un mecanismo de firma para:
- Autenticar al usuario: Asegurar que la subida proviene de una cuenta de Hive válida.
- Prevenir abusos: Limitar la subida de imágenes a usuarios con cierta reputación o participación en la red.
- Asociar la imagen (opcionalmente): Aunque la firma principal es para la URL de subida, la imagen luego se usa en posts que sí se firman con la clave de posting para la blockchain.
El proceso de firma implica crear un hash único a partir de los datos de la imagen y una cadena de desafío, y luego firmar ese hash con la clave de posting privada del usuario. El servidor de imágenes puede entonces verificar esta firma usando la clave pública correspondiente.
Paso 1: Instalación de Dependencias
Necesitaremos dhive para las operaciones criptográficas de Hive y crypto (que es un módulo nativo de Node.js, pero lo mencionamos para claridad).
npm install @hiveio/dhive
# O si usas yarn:
# yarn add @hiveio/dhive
Paso 2: Configuración de Variables de Entorno
Crea un archivo .env.local en la raíz de tu proyecto Next.js y añade las siguientes variables. Nunca subas este archivo a tu repositorio Git.
# .env.local

# Nombre de la cuenta de Hive que se usará para firmar las subidas
HIVE_UPLOAD_ACCOUNT_NAME="tu_nombre_de_usuario_hive"

# Clave de POSTING PRIVADA de la cuenta HIVE_UPLOAD_ACCOUNT_NAME
# ¡TRATAR CON EXTREMO CUIDADO!
POSTING_KEY="5K...tu_clave_de_posting_privada"
Asegúrate de reemplazar los valores de ejemplo con tus credenciales reales.
Paso 3: Crear la API Route para la Subida de Imágenes
Crearemos un Route Handler en Next.js para manejar las peticiones de subida.
Ubicación del archivo: src/app/api/images/upload/route.ts
// src/app/api/images/upload/route.ts
import { NextRequest, NextResponse } from "next/server";
import { PrivateKey } from "@hiveio/dhive";
import crypto from "crypto";

// --- Constantes y Configuración ---
const HIVE_UPLOAD_ACCOUNT_NAME = process.env.HIVE_UPLOAD_ACCOUNT_NAME;
const HIVE_UPLOAD_POSTING_KEY = process.env.POSTING_KEY;

// URL base del servicio de imágenes de Hive (ajusta si usas otro como Ecency)
const HIVE_IMAGE_SERVICE_URL = "https://images.hive.blog/"; // O "https://images.ecency.com/"

/**
 * Sube una imagen a un servicio de imágenes de Hive.
 * @param imageBuffer Buffer de la imagen.
 * @param fileName Nombre del archivo.
 * @param mimeType Tipo MIME del archivo.
 * @returns Objeto con la URL de la imagen subida.
 */
async function uploadToHiveImageService(
  imageBuffer: Buffer,
  fileName: string,
  mimeType: string | null
): Promise<{ imageUrl: string; serviceMetadata?: any }> {
  if (!HIVE_UPLOAD_ACCOUNT_NAME || !HIVE_UPLOAD_POSTING_KEY) {
    throw new Error(
      "[UploadAPI] Credenciales de Hive (HIVE_UPLOAD_ACCOUNT_NAME, POSTING_KEY) no configuradas."
    );
  }

  console.log(
    `[UploadAPI] Intentando subir ${fileName} a ${HIVE_IMAGE_SERVICE_URL} usando la cuenta ${HIVE_UPLOAD_ACCOUNT_NAME}`
  );

  try {
    // 1. Crear el buffer de desafío y concatenarlo con el buffer de la imagen
    // La cadena "ImageSigningChallenge" es una constante usada por images.hive.blog
    const challengeString = "ImageSigningChallenge";
    const challengeBuffer = Buffer.from(challengeString);
    const combinedBuffer = Buffer.concat([challengeBuffer, imageBuffer]);

    // 2. Calcular el hash SHA256 del buffer concatenado
    // Este hash es el mensaje que se firmará.
    const messageHashToSign = crypto
      .createHash("sha256")
      .update(combinedBuffer)
      .digest();

    // 3. Firmar el hash con la clave de posting privada
    const postingKey = PrivateKey.fromString(HIVE_UPLOAD_POSTING_KEY);
    const signature = postingKey.sign(messageHashToSign).toString();

    // 4. Construir la URL de subida
    // El formato es: BASE_URL/USERNAME/SIGNATURE
    const uploadUrl = `${HIVE_IMAGE_SERVICE_URL}${HIVE_UPLOAD_ACCOUNT_NAME}/${signature}`;
    console.log(`[UploadAPI] URL de subida construida: ${uploadUrl}`);

    // 5. Preparar FormData con el archivo
    // El servidor de imágenes espera un POST multipart/form-data
    const formData = new FormData();
    const blob = new Blob([imageBuffer], { type: mimeType || undefined });
    // El nombre del campo para el archivo suele ser 'file'
    formData.append("file", blob, fileName);

    // 6. Realizar la petición POST
    const response = await fetch(uploadUrl, {
      method: "POST",
      body: formData,
      // No es necesario establecer 'Content-Type': 'multipart/form-data' manualmente,
      // fetch lo hace automáticamente con el boundary correcto cuando el body es FormData.
    });

    if (!response.ok) {
      const errorBody = await response.text();
      console.error(
        `[UploadAPI] Error del servidor de imágenes (HTTP ${response.status}): ${errorBody}`
      );
      throw new Error(
        `Error subiendo a Hive Images (HTTP ${response.status}): ${errorBody}`
      );
    }

    // 7. Procesar la respuesta
    // Se espera un JSON con la URL de la imagen, ej: { "url": "https://images.hive.blog/..." }
    const result = await response.json();
    const imageUrl = result.url || result.imageUrl; // Ecency podría usar imageUrl

    if (!imageUrl) {
      console.error(
        "[UploadAPI] Respuesta inesperada del servidor de imágenes:",
        result
      );
      throw new Error(
        `Respuesta inesperada del servidor de imágenes: no se encontró URL en ${JSON.stringify(
          result
        )}`
      );
    }

    console.log(`[UploadAPI] Subida exitosa a Hive Images. URL: ${imageUrl}`);
    return { imageUrl: imageUrl };
  } catch (error) {
    console.error(`[UploadAPI] Falló la subida a Hive Images:`, error);
    // Re-lanzar el error para que sea manejado por el llamador
    throw error;
  }
}

// --- Route Handler Principal ---
export async function POST(request: NextRequest) {
  //Aca podria ir la parte de auth si se usa hive keychain, o una base de datos...

  if (request.method !== "POST") {
    return new NextResponse(null, {
      status: 405,
      headers: { Allow: "POST" },
    });
  }

  try {
    const formDataFromRequest = await request.formData();
    const imageFileEntry = formDataFromRequest.get("image"); // El campo del form se llama 'image'

    if (!imageFileEntry || !(imageFileEntry instanceof File)) {
      return NextResponse.json(
        {
          error:
            'No se proporcionó ningún archivo de imagen válido en el campo "image".',
        },
        { status: 400 }
      );
    }
    const imageFile = imageFileEntry as File;

    // Validar tamaño del archivo (ejemplo: máximo 10MB)
    const MAX_SIZE_MB = 10;
    if (imageFile.size > MAX_SIZE_MB * 1024 * 1024) {
      return NextResponse.json(
        { error: `El archivo excede el tamaño máximo de ${MAX_SIZE_MB}MB.` },
        { status: 413 } // Payload Too Large
      );
    }

    const imageBuffer = Buffer.from(await imageFile.arrayBuffer());
    const originalFileName = imageFile.name || `uploaded_image_${Date.now()}`;
    const mimeType = imageFile.type;

    const { imageUrl, serviceMetadata } = await uploadToHiveImageService(
      imageBuffer,
      originalFileName,
      mimeType
    );

    // (Opcional) Guardar el proceso en una BD o generar un archivo json local en el servidor o un log usando winston

    return NextResponse.json(
      { message: "Imagen subida exitosamente", data: { imageUrl } },
      { status: 201 }
    );
  } catch (error: any) {
    console.error("[UploadAPI] Error en el proceso de subida:", error);
    // Devolver un error genérico al cliente
    let errorMessage = "Error interno del servidor.";
    if (error.message.startsWith("Error subiendo a Hive Images")) {
      errorMessage = error.message; // Propagar el error específico del servicio de imágenes
    }
    return NextResponse.json(
      { error: errorMessage, details: error.message },
      { status: 500 }
    );
  }
}
Paso 4: Implementación en el Frontend
En tu componente de React (por ejemplo, una página de editor), necesitarás un input de tipo file y una función para manejar la subida.
Ejemplo de componente de subida (simplificado):
src/components/ImageUploader.tsx (deberás crearlo o integrarlo en tu página existente)
// src/components/ImageUploader.tsx (Ejemplo)
"use client";

import { useState, ChangeEvent } from "react";

export function ImageUploader() {
  const [message, setMessage] = useState<string>("");
  const [imageUrl, setImageUrl] = useState<string | null>(null);
  const [isUploading, setIsUploading] = useState<boolean>(false);

  const handleFileChange = async (event: ChangeEvent<HTMLInputElement>) => {
    const file = event.target.files?.[0];
    if (!file) {
      return;
    }

    setIsUploading(true);
    setMessage("Subiendo imagen...");
    setImageUrl(null);

    const formData = new FormData();
    formData.append("image", file); // El nombre del campo debe coincidir con el backend

    try {
      // Asume que tu API está en /api/images/upload
      const response = await fetch("/api/images/upload", {
        method: "POST",
        body: formData,
        // No necesitas 'Content-Type' aquí, el navegador lo establece.
      });

      const result = await response.json();

      if (!response.ok) {
        throw new Error(result.error || result.message || "Error en la subida");
      }

      setMessage(result.message);
      setImageUrl(result.data.imageUrl);
    } catch (error: any) {
      console.error("Error al subir la imagen:", error);
      setMessage(`Error: ${error.message}`);
    } finally {
      setIsUploading(false);
    }
  };

  return (
    <div>
      <input
        type="file"
        accept="image/*"
        onChange={handleFileChange}
        disabled={isUploading}
      />
      {isUploading && <p>Procesando...</p>}
      {message && <p>{message}</p>}
      {imageUrl && (
        <div>
          <p>Imagen subida:</p>
          <img
            src={imageUrl}
            alt="Imagen subida"
            style={{ maxWidth: "300px" }}
          />
          <p>URL: {imageUrl}</p>
        </div>
      )}
    </div>
  );
}
Integración en una página:
src/app/my-editor-page/page.tsx (Ejemplo)
// src/app/my-editor-page/page.tsx
import { ImageUploader } from "@/components/ImageUploader"; // Ajusta la ruta

export default function MyEditorPage() {
  return (
    <div>
      <h1>Sube tu Imagen a Hive</h1>
      <ImageUploader />
      {/* Resto de tu editor */}
    </div>
  );
}
Explicación Detallada del Proceso de Firma
La parte crucial es la función uploadToHiveImageService y, específicamente, cómo se genera la firma:
challengeString = "ImageSigningChallenge";
Esta es una cadena fija que el backend deimages.hive.blog(y servicios similares) utiliza como parte del proceso de verificación de la firma. Es como una "sal" conocida por ambas partes.challengeBuffer = Buffer.from(challengeString);
Se convierte la cadena de desafío a unBufferde Node.js.combinedBuffer = Buffer.concat([challengeBuffer, imageBuffer]);
Se crea un nuevo buffer concatenando elchallengeBuffercon elimageBuffer(los bytes reales de la imagen que se va a subir). EstecombinedBufferes el dato único que representará esta subida específica.messageHashToSign = crypto.createHash("sha256").update(combinedBuffer).digest();- Se utiliza el módulo
cryptode Node.js para crear un objeto hash SHA256. update(combinedBuffer): Se alimenta el buffer combinado al algoritmo hash.digest(): Se calcula el hash final. El resultado es unBufferde 32 bytes, que es la longitud estándar para un hash SHA256. Este es el mensaje que realmente se firmará.
- Se utiliza el módulo
postingKey = PrivateKey.fromString(HIVE_UPLOAD_POSTING_KEY);
Se instancia un objetoPrivateKeydedhivea partir de tu clave de posting privada (que obtuviste de.env.local).signature = postingKey.sign(messageHashToSign).toString();postingKey.sign(messageHashToSign): Se utiliza el métodosigndel objetoPrivateKeypara firmar elmessageHashToSign.dhivemaneja la criptografía de curva elíptica (secp256k1) utilizada por Hive..toString(): La firma resultante (un objetoSignaturededhive) se convierte a su representación de cadena hexadecimal, que es lo que se enviará en la URL.
uploadUrl = ${HIVE_IMAGE_SERVICE_URL}${HIVE_UPLOAD_ACCOUNT_NAME}/${signature};
La URL final para la subida se construye concatenando la URL base del servicio de imágenes, el nombre de usuario de Hive que firma, y la firma generada. El servidor de imágenes recibirá esto, reconstruirá el hash de la misma manera (usando "ImageSigningChallenge" y los datos de la imagen recibida), y verificará la firma usando la clave pública delHIVE_UPLOAD_ACCOUNT_NAME. Si la verificación es exitosa, la imagen se procesa.
Consideraciones Adicionales
- Manejo de Errores: El código de ejemplo incluye manejo básico de errores. En una aplicación de producción, querrás un manejo más robusto y mensajes de error más amigables para el usuario.
- Límites de Tamaño: Implementa validación del tamaño del archivo tanto en el frontend como en el backend.
- Tipos de Archivo: Valida los tipos de archivo permitidos (ej.
image/jpeg,image/png,image/gif). - Seguridad de la Clave de Posting: La clave de posting privada nunca debe exponerse al cliente. Toda la lógica de firma y subida debe residir en el backend (API Route).
- Reputación de la Cuenta de Hive: Algunos servicios de imágenes pueden requerir que la cuenta de Hive utilizada para firmar tenga una reputación mínima.
- Servicios Múltiples (Hive Images, Ecency, Cloudinary): El código que te proporcioné en interacciones anteriores (
utils/imageStorageService.ts) muestra cómo determinar dinámicamente qué servicio usar, incluyendo un fallback a Cloudinary. Puedes integrar esa lógica aquí para mayor robustez.
Este tutorial te proporciona una base sólida para implementar la subida de imágenes firmadas a servicios de Hive. ¡Adapta y expande según las necesidades de tu proyecto!
Esto lo comparto porque a pesar de que existen mucha documentacion a veces puede ser confusa
La idea es poder guiar a programadores que apenas llegan a HIVE.
Parte 3: Oferta para usuarios de prueba
Estoy ofreciendo pago en HIVE para quienes prueben la app. Lo unico que deben hacer es:
- Entra a la app AegisPad inicia sesion, sin miedo vamos!
- Ve al editor y redacta un articulo, aunque sea pequeño. Intenta probar todo: agregar imagen por IA, agregar imagenes desde Hivelens, etc. Si tienes errores o ves fallas, toma capture.
- Luego de usar la revision y traduccion, ve a revision final y publica, sin miedo que no muerde!
- Si tienes errores publicalos aca debajo como comentarios en fotos y si necesitas explicalo brevemente y deja el enlace a tu publicacion hecha con AegisPad.
Una vez que yo verifique todo, te envio el pago :D y no pregunten cuanto sera, porque apenas estoy tratando de conseguir fondos para mover el proyecto a nuevos niveles :)
Translation (English)
Greetings Hivers and cosmonauts. It's been a long week trying to juggle many things, first I must thank:
@ecoinstant
@aggroed
@blocktrades
@theycallmedan
@filoriologo @joheredia21 and @jkalthor
That's just to name a few. Thank you for your support and feedback on the app. I will continue improving it to make it a powerful tool. I'll tell you right now that this is a MEGA ARTICLE consisting of 3 parts:
Latest updates to AegisPad
Detailed guide on how to make a photo uploader to Hive using next15
Offer for those who want to try the app
Part 1: AegisPad Updates:
AI Tag Suggestions in the TagInput:
A button was added so you can ask the AI for tag suggestions, either "Popular on Hive" or "Based on Article Content".
You will now see these suggestions in a small pop-up window (Popover) with clickable tags (Badges).
Tags you add from these AI suggestions will have a different color so you can distinguish them.
The tag field now shows a counter (for example, "3/10 tags").
Article Review with Tag Suggestion:
The function that reviews your article with AI can now also, if you request it, suggest between 3 and 5 relevant tags.
On the page where you review the article, you will find a checkbox to activate this tag suggestion option.
Integration of Suggested Tags in the Publication Flow:
If the AI suggests tags during the review, they will be automatically saved when you go to the "Final Review".
Upon reaching the "Final Review" page, these suggested tags will already appear in the tag field (provided you didn't have other tags already placed, apart from the default one).
Organization of the Markdown Toolbar (MarkdownToolbar):
- Buttons were reorganized into logical groups (Styles, Headings, Blocks, Insert) using dropdowns. This improves usability and facilitates the addition of new features useful for bloggers in the future.
Image Upload to HIVE or Cloudinary as a fallback
- Added a button to upload images that first attempts to upload to HIVE's image servers; if they don't respond, it will use ecency's servers, and if that fails, it will use the project's CDN on cloudinary as a backup.
Extra Improvements for Users:
Added messages to the browser console to make it easier to see how tag suggestions flow from the server (this is more for development and testing).
This same button will be disabled if you have already reached the maximum allowed number of tags.
Part 2: Detailed Guide: Uploading Images to Hive with Signature in Next.js
This tutorial will guide you through the process of implementing an image upload system to Hive-compatible services (like images.hive.blog or images.ecency.com/) that require a cryptographic signature to authenticate the upload. We will use Next.js (App Router), TypeScript, and the dhive library.
Prerequisites
Node.js (LTS version recommended)
A Next.js project (you can create one with
npx create-next-app@latest --typescript)A Hive account with its private posting key.
Environment variables configured for credentials.
Why is a signature needed?
Hive-based image hosting services use a signature mechanism to:
Authenticate the user: Ensure that the upload comes from a valid Hive account.
Prevent abuse: Limit image uploads to users with a certain reputation or participation in the network.
Associate the image (optionally): Although the main signature is for the upload URL, the image is then used in posts that are signed with the posting key for the blockchain.
The signing process involves creating a unique hash from the image data and a challenge string, and then signing that hash with the user's private posting key. The image server can then verify this signature using the corresponding public key.
Step 1: Installing Dependencies
We will need dhive for Hive cryptographic operations and crypto (which is a native Node.js module, but we mention it for clarity).
npm install @hiveio/dhive
# Or if you use yarn:
# yarn add @hiveio/dhive
Step 2: Setting Environment Variables
Create a .env.local file in the root of your Next.js project and add the following variables. Never commit this file to your Git repository.
# .env.local

# Name of the Hive account that will be used to sign uploads
HIVE_UPLOAD_ACCOUNT_NAME="your_hive_username"

# PRIVATE POSTING KEY of the HIVE_UPLOAD_ACCOUNT_NAME account
# HANDLE WITH EXTREME CARE!
POSTING_KEY="5K...your_private_posting_key"
Make sure to replace the example values with your actual credentials.
Step 3: Creating the Image Upload API Route
We will create a Route Handler in Next.js to handle upload requests.
File location: src/app/api/images/upload/route.ts
// src/app/api/images/upload/route.ts
import { NextRequest, NextResponse } from "next/server";
import { PrivateKey } from "@hiveio/dhive";
import crypto from "crypto";

// --- Constants and Configuration ---
const HIVE_UPLOAD_ACCOUNT_NAME = process.env.HIVE_UPLOAD_ACCOUNT_NAME;
const HIVE_UPLOAD_POSTING_KEY = process.env.POSTING_KEY;

// Base URL of the Hive image service (adjust if you use another like Ecency)
const HIVE_IMAGE_SERVICE_URL = "https://images.hive.blog/"; // Or "https://images.ecency.com/"

/**

* Uploads an image to a Hive image service.

* @param imageBuffer Image buffer.

* @param fileName File name.

* @param mimeType MIME type of the file.
- @returns Object with the URL of the uploaded image.
*/
async function uploadToHiveImageService(
imageBuffer: Buffer,
fileName: string,
mimeType: string | null
): Promise<{ imageUrl: string; serviceMetadata?: any }> {
if (!HIVE_UPLOAD_ACCOUNT_NAME || !HIVE_UPLOAD_POSTING_KEY) {
throw new Error(
"[UploadAPI] Hive credentials (HIVE_UPLOAD_ACCOUNT_NAME, POSTING_KEY) not configured."
);
}
console.log(
[UploadAPI] Attempting to upload ${fileName} to ${HIVE_IMAGE_SERVICE_URL} using account ${HIVE_UPLOAD_ACCOUNT_NAME}
);
try {
// 1. Create the challenge buffer and concatenate it with the image buffer
// The string "ImageSigningChallenge" is a constant used by images.hive.blog
const challengeString = "ImageSigningChallenge";
const challengeBuffer = Buffer.from(challengeString);
const combinedBuffer = Buffer.concat([challengeBuffer, imageBuffer]);
// 2. Calculate the SHA256 hash of the concatenated buffer
// This hash is the message that will be signed.
const messageHashToSign = crypto
.createHash("sha256")
.update(combinedBuffer)
.digest();
// 3. Sign the hash with the private posting key
const postingKey = PrivateKey.fromString(HIVE_UPLOAD_POSTING_KEY);
const signature = postingKey.sign(messageHashToSign).toString();
// 4. Build the upload URL
// The format is: BASE_URL/USERNAME/SIGNATURE
const uploadUrl = ${HIVE_IMAGE_SERVICE_URL}${HIVE_UPLOAD_ACCOUNT_NAME}/${signature};
console.log([UploadAPI] Upload URL built: ${uploadUrl});
// 5. Prepare FormData with the file
// The image server expects a multipart/form-data POST
const formData = new FormData();
const blob = new Blob([imageBuffer], { type: mimeType || undefined });
// The field name for the file is usually 'file'
formData.append("file", blob, fileName);
// 6. Make the POST request
const response = await fetch(uploadUrl, {
method: "POST",
body: formData,
// It is not necessary to manually set 'Content-Type': 'multipart/form-data',
// fetch does it automatically with the correct boundary when the body is FormData.
});
if (!response.ok) {
const errorBody = await response.text();
console.error(
[UploadAPI] Image server error (HTTP ${response.status}): ${errorBody}
);
throw new Error(
Error uploading to Hive Images (HTTP ${response.status}): ${errorBody}
);
}
// 7. Process the response
// A JSON with the image URL is expected, e.g.: { "url": "https://images.hive.blog/..." }
const result = await response.json();
const imageUrl = result.url || result.imageUrl; // Ecency might use imageUrl
 if (!imageUrl) {
      console.error(
        "[UploadAPI] Unexpected response from the image server:",
        result
      );
      throw new Error(
        `Unexpected response from the image server: URL not found in ${JSON.stringify(
          result
        )}`
      );
    }

console.log(`[UploadAPI] Successful upload to Hive Images. URL: ${imageUrl}`);
    return { imageUrl: imageUrl };
  } catch (error) {
    console.error(`[UploadAPI] Upload to Hive Images failed:`, error);
    // Re-throw the error to be handled by the caller
    throw error;
  }
}

// --- Main Route Handler ---
export async function POST(request: NextRequest) {
  //Authentication could go here if using hive keychain, or a database...

if (request.method !== "POST") {
    return new NextResponse(null, {
      status: 405,
      headers: { Allow: "POST" },
    });
  }

try {
    const formDataFromRequest = await request.formData();
    const imageFileEntry = formDataFromRequest.get("image"); // The form field is called 'image'

if (!imageFileEntry || !(imageFileEntry instanceof File)) {
      return NextResponse.json(
        {
          error:
            'No valid image file provided in the "image" field.',
        },
        { status: 400 }
      );
    }
    const imageFile = imageFileEntry as File;

// Validate file size (example: maximum 10MB)
    const MAX_SIZE_MB = 10;
    if (imageFile.size > MAX_SIZE_MB * 1024 * 1024) {
      return NextResponse.json(
        { error: `File exceeds the maximum size of ${MAX_SIZE_MB}MB.` },
        { status: 413 } // Payload Too Large
      );
    }

const imageBuffer = Buffer.from(await imageFile.arrayBuffer());
    const originalFileName = imageFile.name || `uploaded_image_${Date.now()}`;
    const mimeType = imageFile.type;

const { imageUrl, serviceMetadata } = await uploadToHiveImageService(
      imageBuffer,
      originalFileName,
      mimeType
    );

// (Optional) Save the process in a DB or generate a local json file on the server or a log using winston
 return NextResponse.json(
      { message: "Image uploaded successfully", data: { imageUrl } },
      { status: 201 }
    );
  } catch (error: any) {
    console.error("[UploadAPI] Error during upload process:", error);
    // Return a generic error to the client
    let errorMessage = "Internal server error.";
    if (error.message.startsWith("Error uploading to Hive Images")) {
      errorMessage = error.message; // Propagate the specific error from the image service
    }
    return NextResponse.json(
      { error: errorMessage, details: error.message },
      { status: 500 }
    );
  }
}
Step 4: Frontend Implementation
In your React component (for example, an editor page), you will need a file input of type file and a function to handle the upload.
Example upload component (simplified):
src/components/ImageUploader.tsx (you will need to create it or integrate it into your existing page)
// src/components/ImageUploader.tsx (Example)
"use client";

import { useState, ChangeEvent } from "react";

export function ImageUploader() {
  const [message, setMessage] = useState<string>("");
  const [imageUrl, setImageUrl] = useState<string | null>(null);
  const [isUploading, setIsUploading] = useState<boolean>(false);

const handleFileChange = async (event: ChangeEvent<HTMLInputElement>) => {
    const file = event.target.files?.[0];
    if (!file) {
      return;
    }

setIsUploading(true);
    setMessage("Uploading image...");
    setImageUrl(null);

const formData = new FormData();
    formData.append("image", file); // The field name must match the backend

try {
      // Assumes your API is at /api/images/upload
      const response = await fetch("/api/images/upload", {
        method: "POST",
        body: formData,
        // You don't need 'Content-Type' here, the browser sets it.
      });

const result = await response.json();

if (!response.ok) {
        throw new Error(result.error || result.message || "Error during upload");
      }

setMessage(result.message);
      setImageUrl(result.data.imageUrl);
    } catch (error: any) {
      console.error("Error uploading image:", error);
      setMessage(`Error: ${error.message}`);
    } finally {
      setIsUploading(false);
    }
  };

return (
    <div>
      <input
        type="file"
        accept="image/*"
        onChange={handleFileChange}
        disabled={isUploading}
      />
      {isUploading && <p>Processing...</p>}
      {message && <p>{message}</p>}
      {imageUrl && (
        <div>
          <p>Image uploaded:</p>
          <img
            src={imageUrl}
            alt="Uploaded image"
            style={{ maxWidth: "300px" }}
          />
          <p>URL: {imageUrl}</p>
        </div>
      )}
    </div>
  );
}
Integration into a page:
src/app/my-editor-page/page.tsx (Example)
// src/app/my-editor-page/page.tsx
import { ImageUploader } from "@/components/ImageUploader"; // Adjust the path


```javascript
 export default function MyEditorPage() {
  return (
    <div>
      <h1>Upload Your Image to Hive</h1>
      <ImageUploader />
      {/* Rest of your editor */}
    </div>
  );
}
Detailed Explanation of the Signing Process
The crucial part is the uploadToHiveImageService function and, specifically, how the signature is generated:
challengeString = "ImageSigningChallenge";
This is a fixed string that theimages.hive.blogbackend (and similar services) uses as part of the signature verification process. It's like a "salt" known to both parties.challengeBuffer = Buffer.from(challengeString);
The challenge string is converted to a Node.jsBuffer.combinedBuffer = Buffer.concat([challengeBuffer, imageBuffer]);
A new buffer is created by concatenating thechallengeBufferwith theimageBuffer(the actual bytes of the image to be uploaded). ThiscombinedBufferis the unique data that will represent this specific upload.messageHashToSign = crypto.createHash("sha256").update(combinedBuffer).digest();
The Node.js
cryptomodule is used to create a SHA256 hash object.update(combinedBuffer): The combined buffer is fed to the hash algorithm.digest(): The final hash is calculated. The result is a 32-byteBuffer, which is the standard length for a SHA256 hash. This is the message that will actually be signed.
postingKey = PrivateKey.fromString(HIVE_UPLOAD_POSTING_KEY);
APrivateKeyobject fromdhiveis instantiated from your private posting key (obtained from.env.local).signature = postingKey.sign(messageHashToSign).toString();
postingKey.sign(messageHashToSign): Thesignmethod of thePrivateKeyobject is used to sign themessageHashToSign.dhivehandles the elliptic curve cryptography (secp256k1) used by Hive..toString(): The resulting signature (adhiveSignatureobject) is converted to its hexadecimal string representation, which is what will be sent in the URL.
uploadUrl = ${HIVE_IMAGE_SERVICE_URL}${HIVE_UPLOAD_ACCOUNT_NAME}/${signature};
The final upload URL is constructed by concatenating the base URL of the image service, the signing Hive username, and the generated signature. The image server will receive this, reconstruct the hash in the same way (using "ImageSigningChallenge" and the received image data), and verify the signature using the public key of theHIVE_UPLOAD_ACCOUNT_NAME. If the verification is successful, the image is processed.
Additional Considerations
Error Handling: The example code includes basic error handling. In a production application, you will want more robust handling and more user-friendly error messages.
Size Limits: Implement file size validation on both the frontend and backend.
File Types: Validate allowed file types (e.g.,
image/jpeg,image/png,image/gif).Posting Key Security: The private posting key should never be exposed to the client. All signing and upload logic must reside in the backend (API Route).
Hive Account Reputation: Some image services may require that the Hive account used for signing has a minimum reputation.
Multiple Services (Hive Images, Ecency, Cloudinary): The code I provided you in previous interactions (
utils/imageStorageService.ts) shows how to dynamically determine which service to use, including a fallback to Cloudinary. You can integrate that logic here for greater robustness.
This tutorial provides a solid foundation for implementing signed image uploads to Hive services. Adapt and expand according to your project's needs!
I'm sharing this because even though there's a lot of documentation, it can sometimes be confusing
The idea is to be able to guide programmers who are just arriving at HIVE.
Part 3: Offer for test users
I am offering payment in HIVE for those who test the app. All you have to do is:
- Go to the app AegisPad and log in, don't be afraid!
Go to the editor and write an article, even a small one. Try to test everything: add image by AI, add images from Hivelens, etc. If you have errors or see flaws, take a screenshot.
After using the revision and translation, go to final revision and publish, don't be afraid, it doesn't bite!
If you have errors, post them below as comments in photos and if you need to, explain them briefly and leave the link to your publication made with AegisPad.
Once I verify everything, I'll send you the payment :D and don't ask how much it will be, because I'm just trying to get funds to move the project to new levels :)
[@PowerPaul:]
Hey buddy. Greetings! Because of your participation in the CrptoCompany community you received a vote from @CryptoCompany and its trail!
Thank you for your participation & Hive a great day!