ENGLISH CONTENT
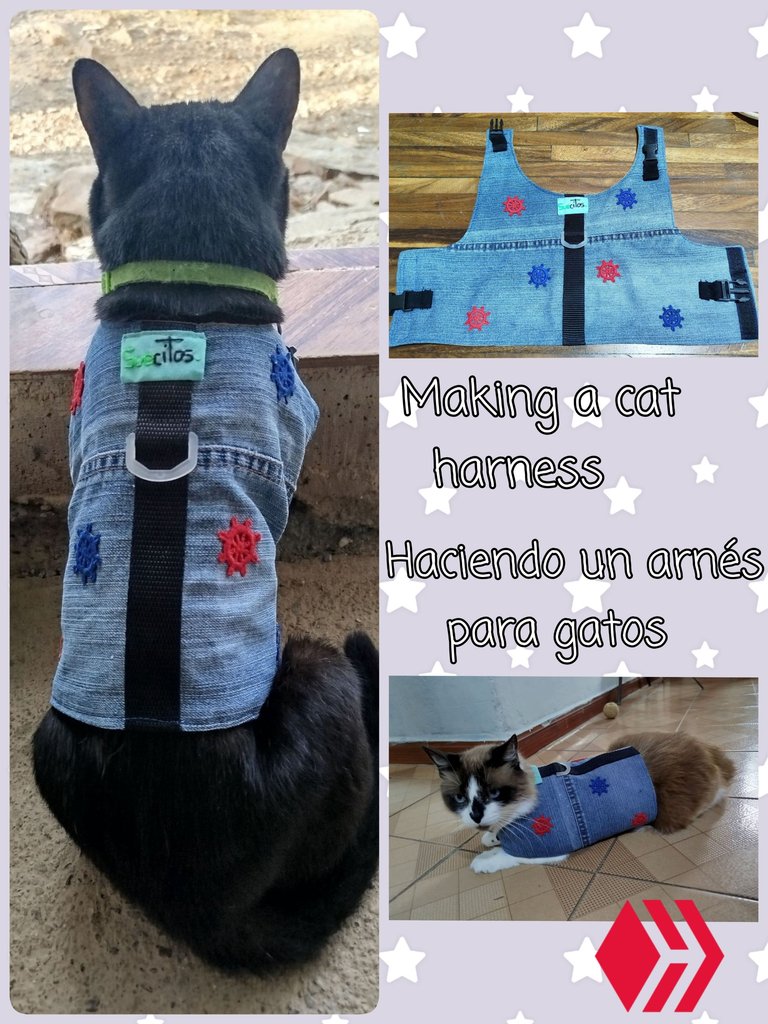
Hello to all the members of this community and cat lovers! Normally during each Caturday, I usually talk about the adventures of Ying, my feline nephew or Ikki, my kitten. But today I will take the opportunity to show you how I made the harness for my cat Ikki, since the one I made for him a few years ago, apparently he left abandoned in the countryside where he lives (it is still a mystery where it ended up 😅). I have never bought a harness as such for my cat, since after having examined the shape of them, I was curious to see if I could make one and after making the first one, I was convinced that I could recreate it once again.
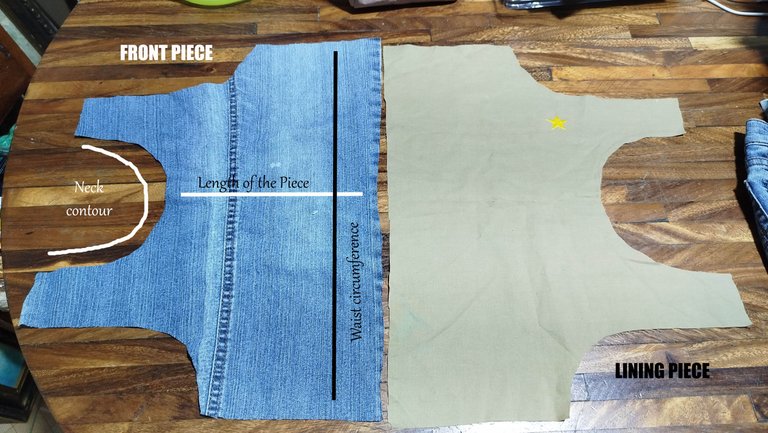
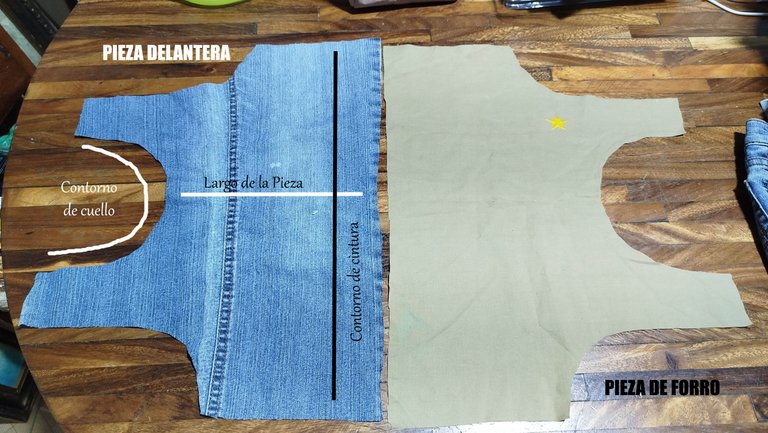
I didn't have a pattern as such, as I had drawn it directly on the fabric last time. So this time, I decided to first make a pattern on bond paper using my cat's measurements. I took them in advance and they were as follows:
Neck Girth: Leaving enough room for a snug, yet comfortable fit.
Length: This refers to the length I wanted the harness to be, from the neck area to the bottom of the piece. It could be said to be like the "length of the shirt," since I wanted it to cover part of his tummy.
Waist or Girth: The measurement I took around the entire circumference of my cat's belly.
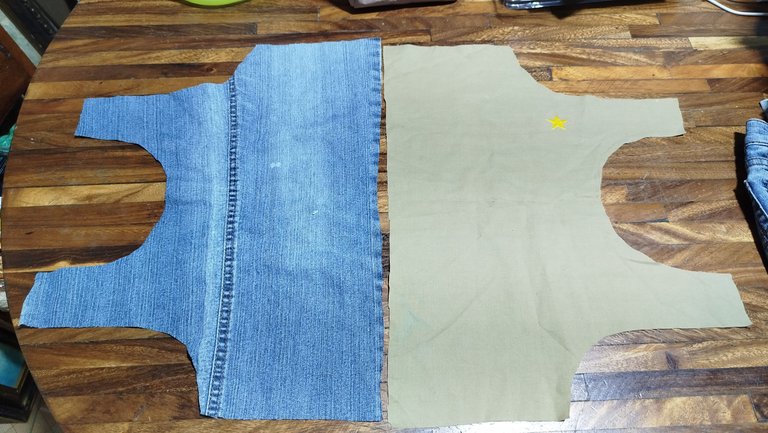
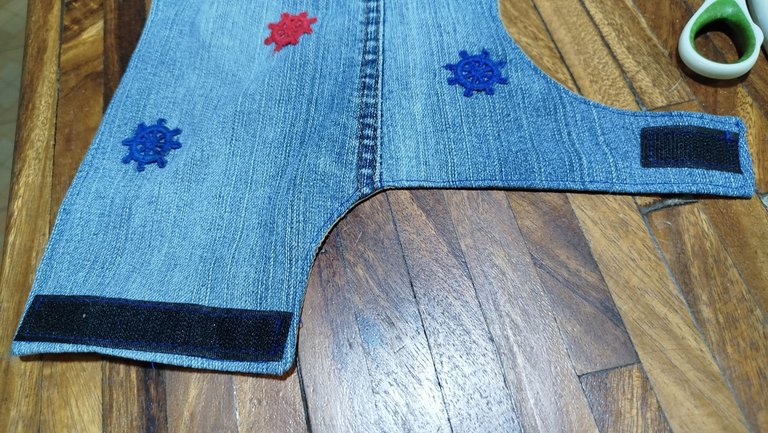
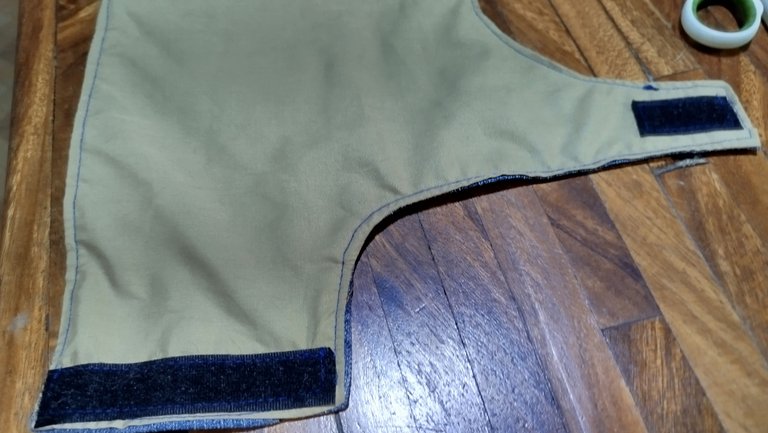
With these measurements, I proceeded to draw the harness pattern as if I were making the front of a shirt. When transferring it to the fabric, I cut two pieces with their respective increases: one from blue denim and the other from a thinner fabric that would serve as the lining. It's worth mentioning that around the neckline, I'll need to add about 2 cm of excess fabric to accommodate the Velcro.
 |  |
|---|
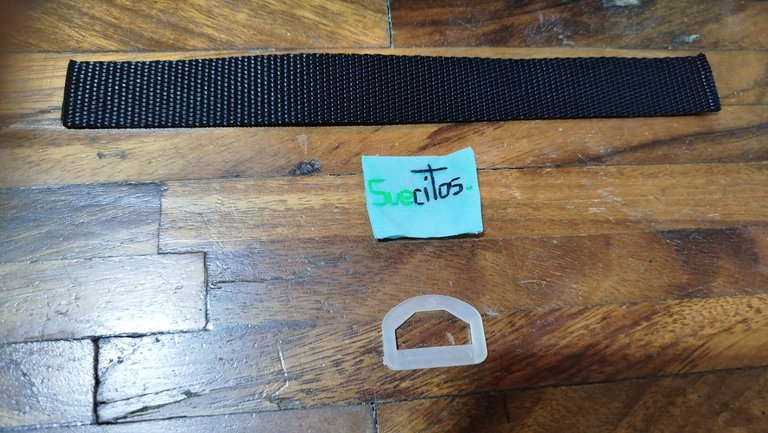
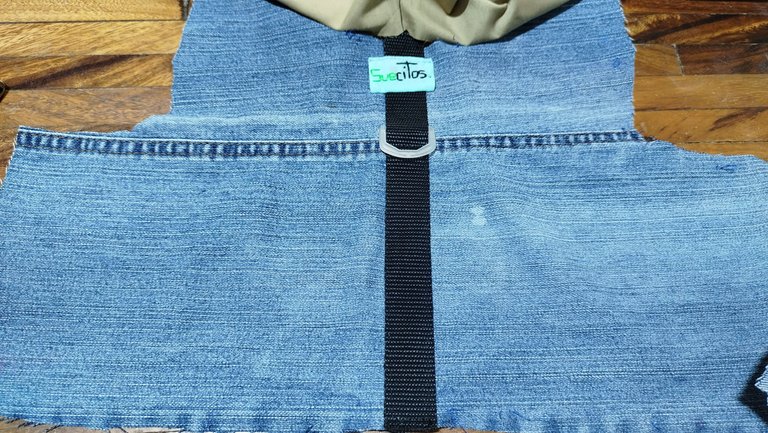
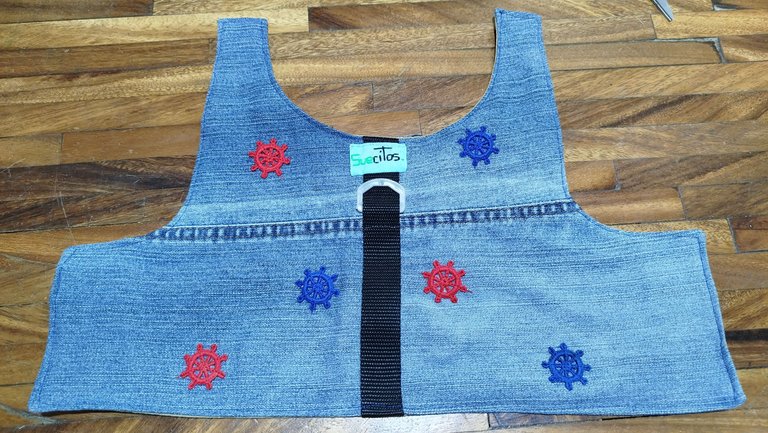
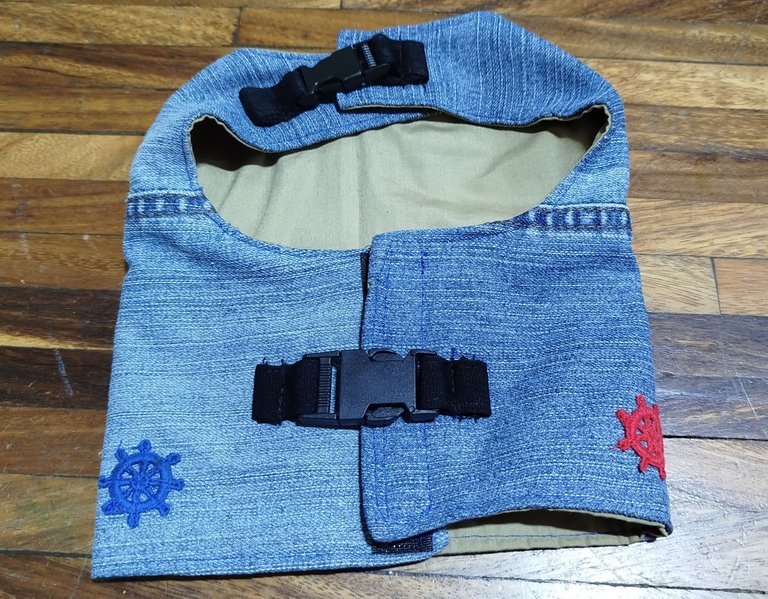
Before joining both pieces of the harness, I sewed a piece of thick ribbon to the center of the front piece, into which I inserted a plastic ring (preferably a metal one, this was the one I had on hand 😅), which will allow us to attach the strap strip, in case the harness is used for walks. In addition, I sewed a label of my brand, as I usually do with everything I sew from scratch 😌
 |  |  |
|---|
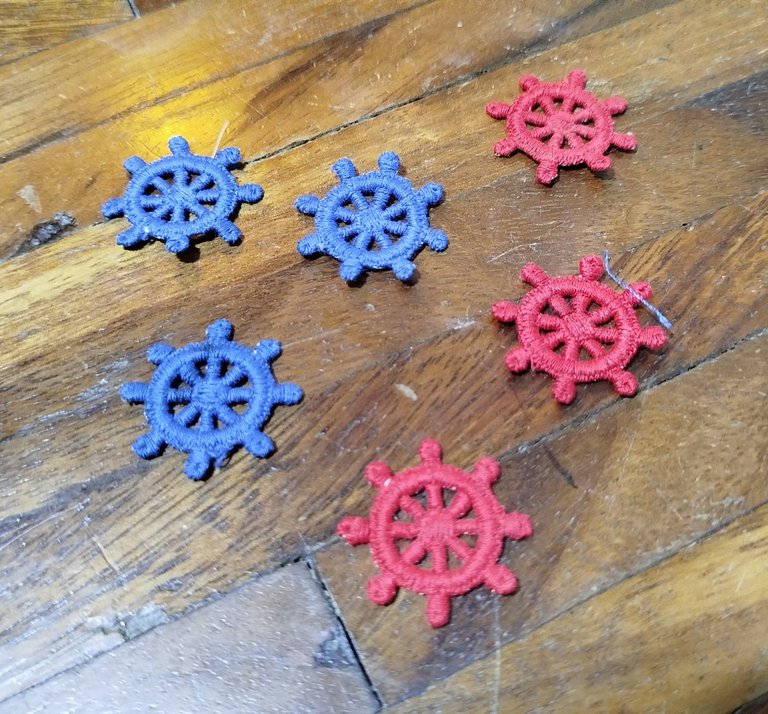
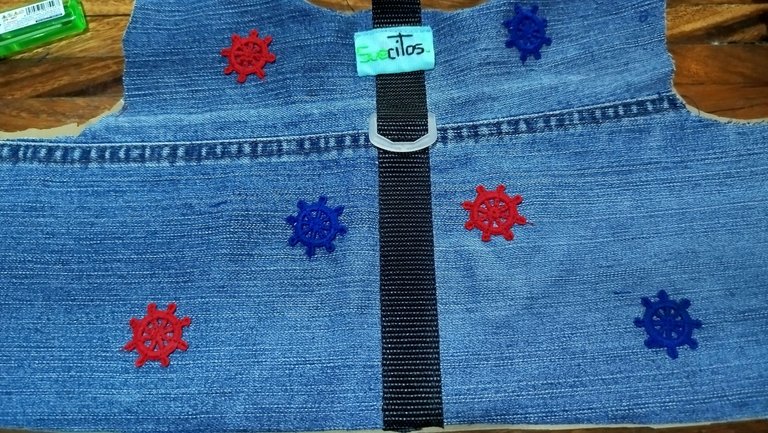
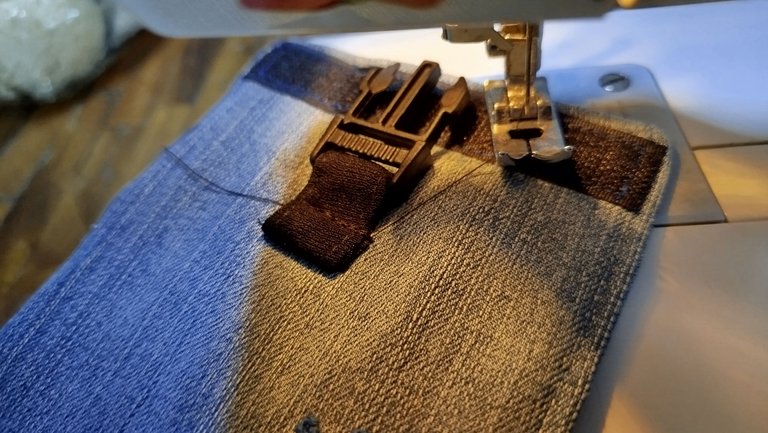
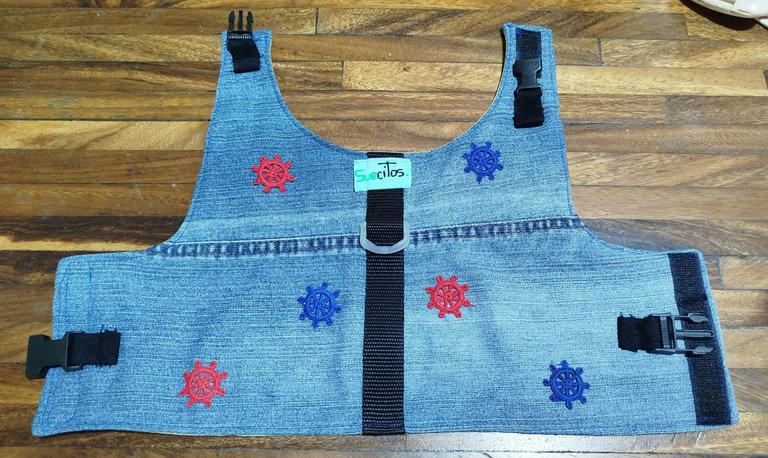
Next, I sewed on some small embroidery pieces I had in the shape of a ship's wheel. Not only does it add style to the harness, but it also allowed me to cover up some imperfections in the fabric, since I got it from a pair of pants I'd stopped using and had gotten a few drops of chlorine on it. 😅 I would have liked to do some more feline-style embroidery, but since I was making the harness just a few days before my trip, I decided to use the materials I had available.
 |  |
|---|
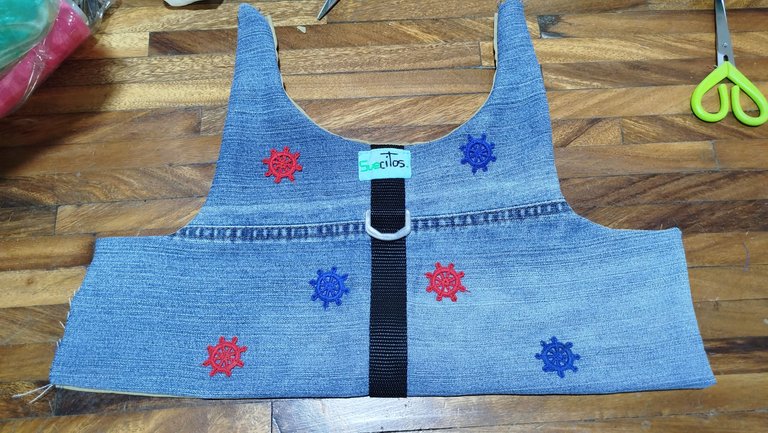
Now, I joined both pieces with a straight seam, leaving an opening to turn the piece inside out. Then, I sewed around the entire edge to press the fabric down and close the open area.
 |  |  |
|---|
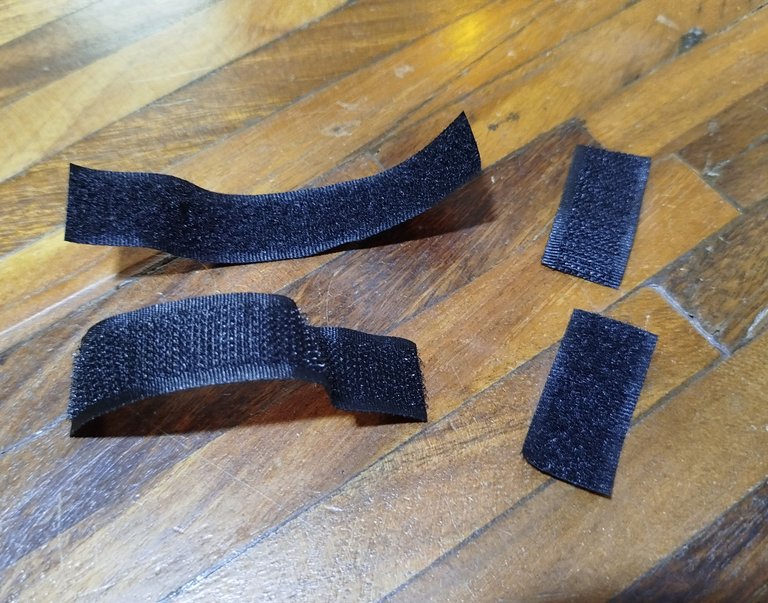
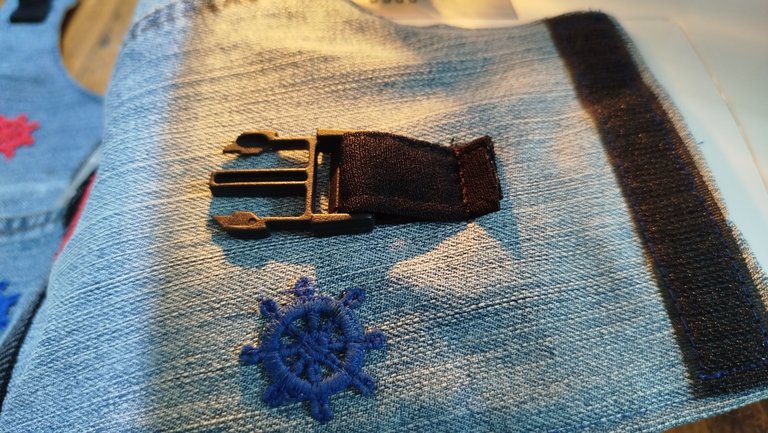
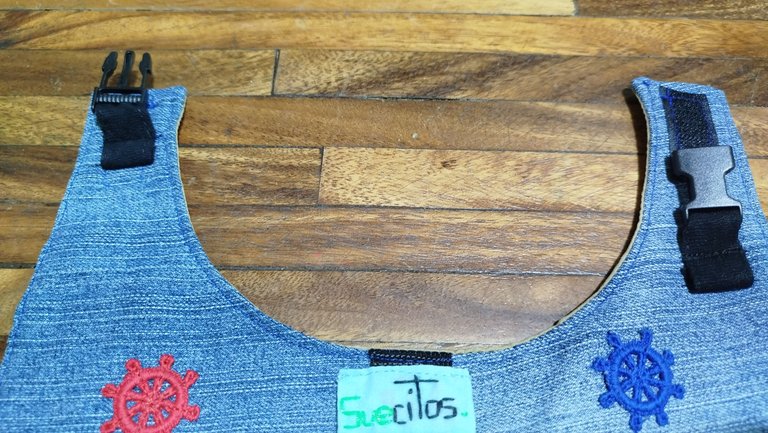
Once this was done, I decided how the harness would close. To do this, I first used Velcro or a magic tape. Preferably, the one used on the belly area should be fairly thick for added security.
 |  |  |
|---|
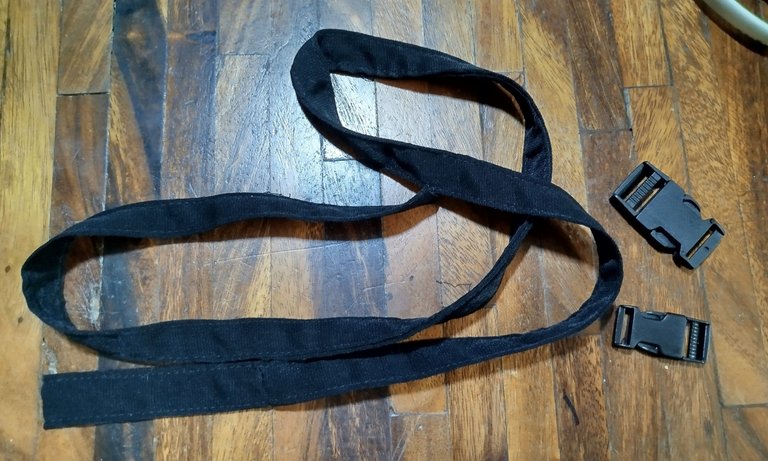
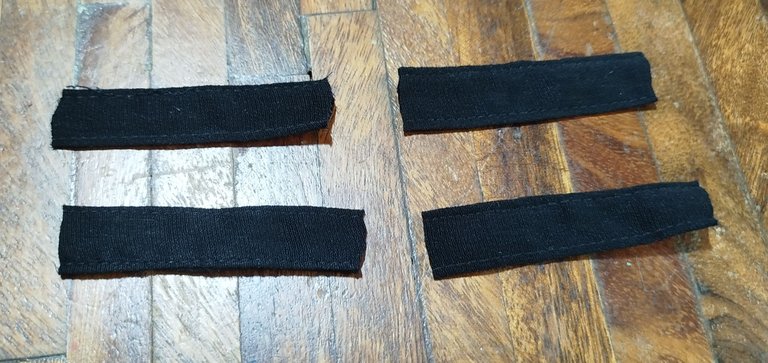
However, Velcro isn't enough to close the harness. So to prevent our feline from removing the garment with its paws, a pair of plastic buckles must be attached: one for the neck and the other for the waist area. To attach them to the harness, we'll also need an extra piece of webbing. In my case, I used a strip of leftover fabric I had sewn for a previous project. I cut four pieces from the strip and sewed it together with the sewing machine.
 |  |
|---|
When sewing the buckles, make sure that the harness is sewn to the cat's measurements. It's best to try the piece on the feline as you go along to avoid making mistakes. In my case, I used my sister's cat as a model. The downside is that Ying is much fatter than my cat, so I had to keep that in mind at all times, because if I made the harness too loose, Ikki would quickly take it off in a few seconds.
 |  |
|---|
 |  |  |
|---|
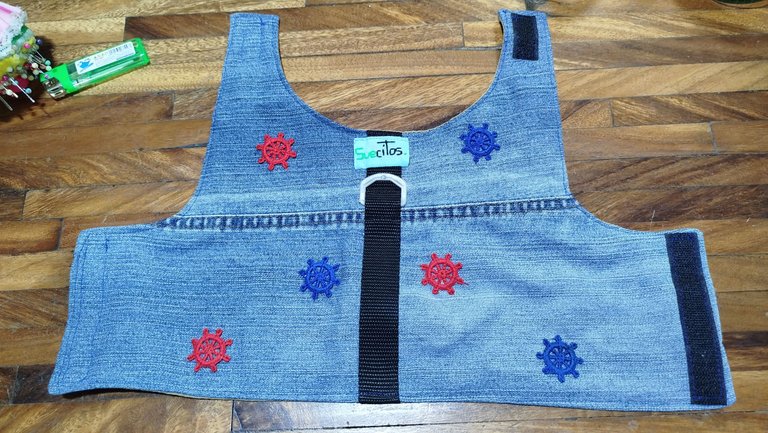
After sewing the buckles, the harness was finished ✨
 | 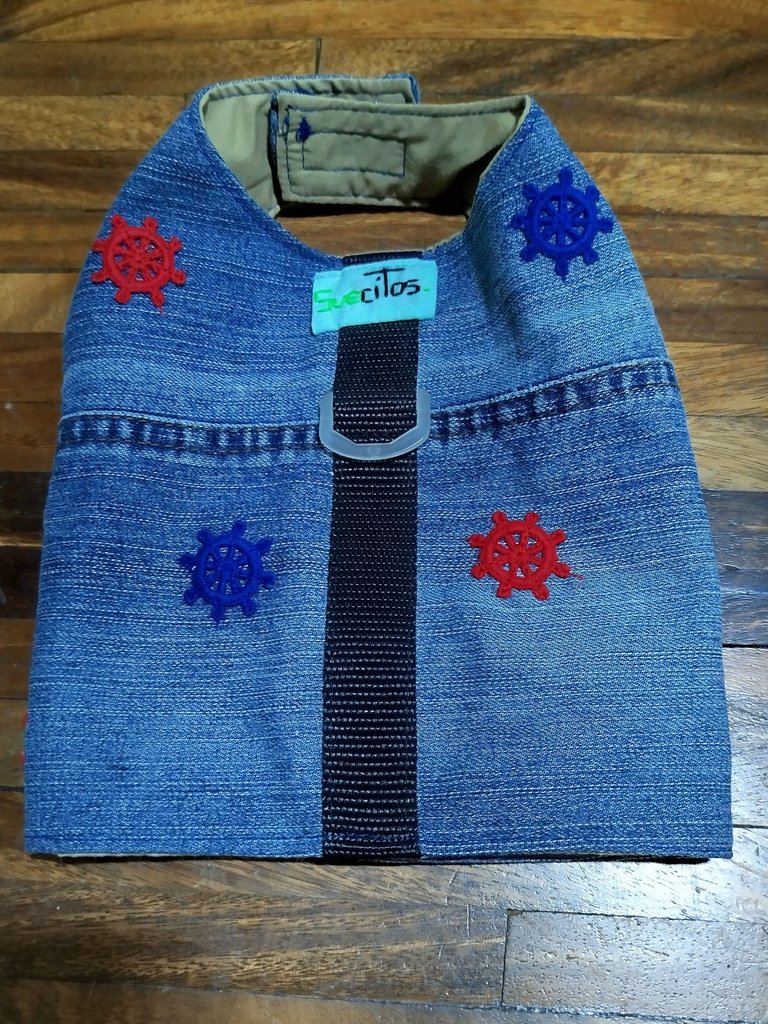 |
|---|
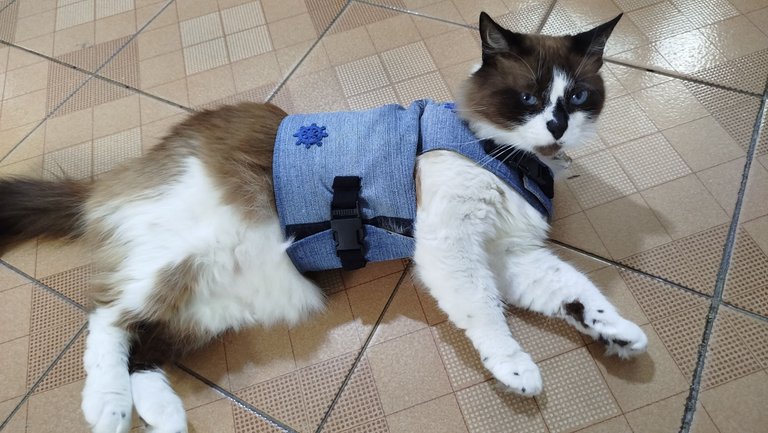
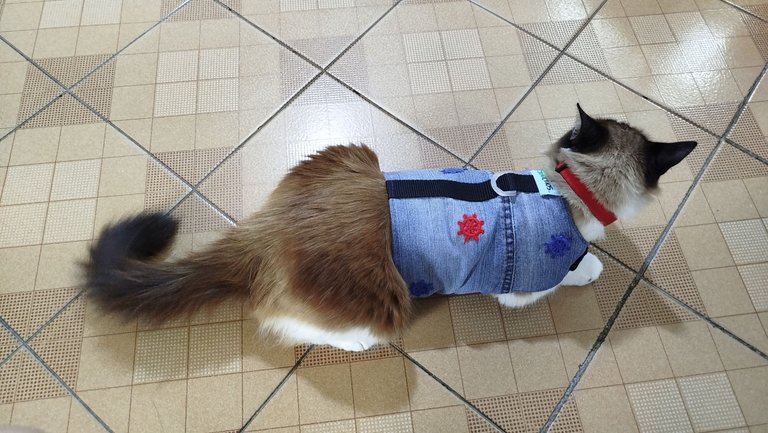
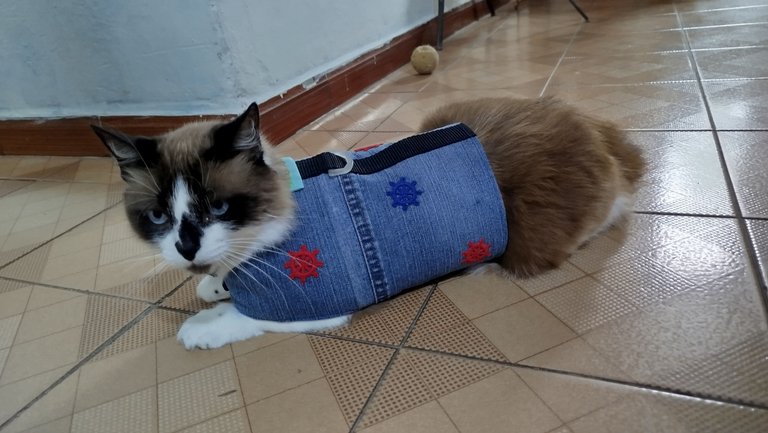
Of course, when I tried it on my sister’s cat Ying, it was obvious that it was too tight (it was really hard to fasten 😆), you could see that the poor thing was uncomfortable and didn’t want to move, that’s why you won’t see any poses of him standing up 😅 I did worry for a moment, but since the measurements of both cats have a lot of difference in the belly area, I was relieved 😊 That way, I took a few photos and took it off immediately. Ying is happy without wearing a corset like that on top, even his little face showed the boredom 😂
 |  |  |
|---|
If you want to see how it looks on my cat Ikki (for whom I specially made the harness), you can do so in this post , where I uploaded some photos while I was with him, verifying that it fit him perfectly and motivating me to make him a more colorful one in the future 😊
As you requested, dear @tesmoforia, here is the harness tutorial. I hope it helps 😚💚
Thank you so much for visiting my post. I hope you found it interesting.
💚 See you next Caturday! 💚

CONTENIDO EN ESPAÑOL
¡Hola a todos los integrantes de ésta comunidad y amantes de los gatos! Normalmente durante cada Caturday, suelo hablarles acerca de las aventuras de Ying, ni sobrino gatuno o de Ikki, mi gatijo. Pero el día de hoy aprovecharé para mostrarles cómo elaboré el arnés para mi gato Ikki, ya que el que le había hecho hace unos años atrás, parece ser que lo dejó abandonado en el campo en donde vive (aún es un misterio en dónde quedó 😅). Nunca le he comprado un arnés como tal a mi gato, ya que luego de haber examinado la forma que tenían los mismos, tuve la curiosidad de ver si podía realizar uno y tras hacer el primero, estaba convencida de que podría recrearlo una vez más.
No tenía un patrón como tal, ya que la vez pasada había hecho el dibujo directamente en la tela, así que ésta vez si pensé en elaborar primero un patrón en papel bond con las medidas de mi gato, las cuales tomé con anticipación y fueron las siguientes:
Contorno de cuello: Teniendo en cuenta dejar un espacio suficiente para que le quedase ajustado, pero cómodo.
Largo: Se refiere a la extensión que deseaba para el arnés desde la zona del cuello hasta la parte inferior de la pieza. Podría decirse que es como el "largo de la camisa", ya que deseaba que el mismo, le cubriera parte de la pancita.
Cintura o contorno: Medida que tomé de todo el contorno de la barriga de mi gato.
Con estas medidas, procedí a dibujar el patrón del arnés como si estuviera realizando la pieza delantera de una camisa. Al pasarlo a la tela, corté dos piezas con sus respectivos aumentos: Una en tela de blue jean y otra de una tela más delgada que haría la función de forro. Cabe mencionar que en la zona del cuello, hay que agregar un excedente de alrededor de 2cm de tela, para poder colocar el velcro.
 | |
|---|
Antes de unir ambas piezas del arnés, le cosí en la parte central de la pieza delantera, un trozo de cinta gruesa, al cual le inserté un aro de plástico (de preferencia, usar uno de metal, éste era el que tenía a la mano 😅), el cual nos permitirá anexar la tira de la correa, en el caso de que el arnés sea usado para paseos. Adicional a eso, le cosí una etiqueta de mi marca, como suelo hacer con todas las cosas que coso desde cero 😌
| | |
|---|
Seguidamente, le cosí unos pequeños bordados que tenía en forma de timón de barco. No sólo le aporta estilo al arnés, sino que me permitió cubrir algunas imperfecciones de la tela, ya que la obtuve de un pantalón que dejé de usar y que le habían caído unas gotitas de cloro 😅 Me hubiese gustado hacerle unos bordados más al estilo felino, pero como estaba haciendo el arnés con pocos días antes de mi viaje, decidí usar los materiales que tenía a disposición.
| |
|---|
Ahora sí, procedí a unir ambas piezas con una costura recta, dejando una abertura para voltear la pieza. Luego, le pasé una costura por todo el borde para pisar la tela y cerrar la parte abierta.
| | |
|---|
Una vez hecho esto, me encargué de la forma en que el arnés cerraría. Para ello utilicé primero velcro o cierre mágico. De preferencia, el que se use en la parte de la barriga, debe ser bastante grueso, para mayor seguridad.
| | |
|---|
Sin embargo, el velcro no es suficiente para cerrar el arnés. Así que para evitar que nuestro felino se retire la prenda con sus patitas, se debe colocar un par de hebillas de plástico: Una para el cuello y la otra, para la zona de la cintura. Para poder anexarlas al arnés, necesitaremos también un trozo de cinta extra. En mi caso, utilicé una tira de tela sobrante que había cosido para un proyecto anterior. Corté cuatro trocitos de la tira y procedí a coserla con la máquina de coser.
| |
|---|
A la hora de coser las hebillas, hay que procurar que al cerrar el arnés, se obtengan las medidas del gato. Lo mejor es irle probando la pieza al felino a medida que se vaya avanzando, para evitar cometer errores. En mi caso, utilizaba como modelo al gato de mi hermana. Lo malo, es que Ying es mucho más gordo que mi gato, así que tenía que recordar ese detalle en todo momento, pues si hacía el arnés demasiado holgado, Ikki no tardaría en quitárselo a los pocos segundos.
| |
|---|
| | |
|---|
Tras haber cosido las hebillas, el arnés estuvo terminado ✨
| |
|---|
Por supuesto, cuando se lo probé a Ying, el gato de mi hermana, se veía que le quedaba demasiado ajustado (me costó demasiado cerrarlo 😆), se notaba que el pobre se sentía incómodo y no se quería mover, por eso no verán ninguna pose de él estando de pie 😅 Si me llegué a preocupar un momento, pero como las medidas de ambos gatos tienen mucha diferencia en la zona de la barriga, me alivié 😊 De esa forma, tomé unas cuantas fotos y se lo quité de inmediato. Ying es feliz sin llevar un corsé como ese encima, hasta en su carita se notaba el tedio 😂
| | |
|---|
Si desean ver cómo le quedó a mi gato Ikki (para quién hice especialmente el arnés), pueden hacerlo en este post , en donde subí algunas fotografías mientras estuve con él, verificando que le quedaba a la perfección y motivándome a hacerle uno más colorido en el futuro 😊
Como me pediste @tesmoforia querida, aquí está el tutorial del arnés, espero que te sirva 😚💚
Muchas gracias por haber visitado mi publicación. Espero que les haya parecido interesante.
💚 ¡Hasta un próximo Caturday! 💚
This post has been shared on Reddit by @suezoe through the HivePosh initiative.
¡AAAAAAAAAAAH! ESTA MUY LINDOOOO 💙 💙 💙 Te agradezco muchísimo haber incluido las instrucciones de cómo tomar las medidas! Imaginaba que el patrón base sería como curvo pero es todo recto a excepción del cuello, y se ve muy bien, muy seguro 😍 Gracias Zoe!